Lurker (Monitoring) Installation
Introduction
The Lurker service gathers machine and program data from various nodes in the network, providing a single REST interface to access the data and query via timestamps.
Lurker fetches measurs from the following sources:
-
calling local JAVA native methods like loadAverage or availableProcessors
-
querying local JMX data like java.lang:type=Threading
-
utilizing Jolokia, which is a JMX-HTTP bridge to access JMX values on remote hosts
Lurker can store the measurements either in memory or using MongoDB. For the latter use, please install MongoDB first.
Prerequisites
Open the following port in the firewall to other ApiOmat nodes:
-
8089 (HTTP)
Installation of Consul is required!
Installation of AdoptOpenJDK is required when not using Docker!
System requirements
The following instance configurations are recommended.
|
Size |
CPU |
Memory |
Disk |
Typical Cloud Instance Types |
|
All |
2 core |
4 GB RAM |
300 MB |
AWS: m5.large, m5.xlarge |
|
|
|
|
|
Azure: Standard_A4_v2, Standard_A8_v2 |
Installation
USERNAME, PASSWORD, and TOKEN values are provided per customer from ApiOmat.
# Install the repo keywget -O - https://repo-int.apiomat.com/yambas/rest/web/Key/LIVE/apiomat-archive-keyring.asc | sudo apt-key add -# Add the repositoryecho "deb https://<USERNAME>:<PASSWORD>@repo.apiomat.com/yambas/rest/web/Repo/LIVE/deb ./" | sudo tee /etc/apt/sources.list.d/apiomat.list# Update APT and installapt-get updateapt-get install -y aom-lurkerservice lurker start# Add the repositoryecho "[apiomat]name=ApiOmatbaseurl=https://<USERNAME>:<PASSWORD>@repo.apiomat.com/yambas/rest/web/Repo/LIVE/rpmgpgcheck=0enabled=1" > /etc/yum.repos.d/apiomat.repo# Installyum -y --nogpgcheck install aom-lurkerservice lurker start# Add the repositoryzypper addrepo --no-gpgcheck https://repo.apiomat.com/yambas/rest/web/Repo/LIVE/suse?token=<TOKEN> "ApiOmat"# Refresh zypper and installzypper refreshzypper --no-gpg-checks --non-interactive install aom-lurkerservice lurker start# Docker logindocker login -u <USERNAME> -p <PASSWORD># Store the following file and execute:docker-compose -f lurker.yml uplurker.yml:
version: '3'services: lurker: image: apiomat/lurker:<VERSION> command: --spring.cloud.consul.enabled=false ports: - "8090:8090"# Docker loginkubectl create secret docker-registry regcred \ --docker-server=https://index.docker.io/v1/ \ --docker-username="<USERNAME>" \ --docker-password="<PASSWORD>" \ --docker-email="<MAIL>"# Store the following file and executekubectl apply -f lurker.yml---# Source: apiomat-lurker/templates/service.yamlkind: ServiceapiVersion: v1metadata: name: release-name-apiomat-lurker labels: app: apiomat-lurker chart: apiomat-lurker-1.1.0 release: "release-name" heritage: "Tiller"spec: ports: - name: http port: 8090 protocol: TCP type: NodePort selector: app: apiomat-lurker release: release-name---# Source: apiomat-lurker/templates/deployment.yamlapiVersion: apps/v1kind: Deploymentmetadata: labels: app: apiomat-lurker chart: apiomat-lurker-1.1.0 heritage: Tiller release: release-name name: release-name-apiomat-lurkerspec: replicas: 1 selector: matchLabels: app: apiomat-lurker chart: apiomat-lurker-1.1.0 release: release-name template: metadata: labels: app: apiomat-lurker chart: apiomat-lurker-1.1.0 release: release-name spec: imagePullSecrets: - name: <regcred> containers: - name: apiomat-lurker image: docker.io/apiomat/lurker:1.1.0 command: - --spring.cloud.consul.enabled=false ports: - containerPort: 8090 name: ms-port resources: limits: memory: 4Gi requests: memory: 4Gi livenessProbe: httpGet: path: /lurker port: 8090 initialDelaySeconds: 30 periodSeconds: 10 timeoutSeconds: 5 successThreshold: 1 failureThreshold: 6 readinessProbe: httpGet: path: /lurker port: 8090 initialDelaySeconds: 5 periodSeconds: 10 timeoutSeconds: 5 successThreshold: 1 failureThreshold: 6 imagePullPolicy: Always securityContext: capabilities: { } privileged: false---# Source: apiomat-lurker/templates/ingress.yamlapiVersion: extensions/v1beta1kind: Ingressmetadata: name: release-name-apiomat-lurker labels: app: apiomat-lurker chart: apiomat-lurker-1.1.0 release: release-name heritage: Tillerspec: rules: - host: "lurker.example.domain" http: paths: - path: / backend: serviceName: release-name-apiomat-lurker servicePort: ms-port---# Source: apiomat-lurker/templates/requirements.yaml# Docker loginkubectl create secret docker-registry regcred \ --docker-server=https://index.docker.io/v1/ \ --docker-username="<USERNAME>" \ --docker-password="<PASSWORD>" \ --docker-email="<MAIL>"# We are using helm to deploy the yambas replicaset helm inithelm repo updatehelm repo add apiomat https://apinautengmbh.github.io/helm/helm fetch apiomat/apiomat-lurker # extract the archive (.tgz) and find the values.yml. Adjust the parameters as required. helm install apiomat/apiomat-lurker --name apiomat-lurker --values values.yaml-
Download file: https://repo.apiomat.com/yambas/rest/web/Repo/LIVE/aom-lurker-<VERSION>.zip?token=<TOKEN> and unzip to installation folder
-
Ensure that the path to your installed jdk\bin is set to the system-environment variable 'Path' (java.exe needs to be accessible for windows' system user!)
-
Open administrative consule and execute
Lurker-<VERSION>.exe install
Lurker-<VERSION>.exe startto install as service and start afterwards.
For a removal of the service, execute
Lurker-<VERSION>.exe uninstall
After service start, the REST API will provide the following endpoints:
curl "http://localhost:8090/lurker/types" -u user:secret
curl "http://localhost:8090/lurker/q/ProcessCpuLoad?to=9999999999999&from=1460356971000&scaleMilliSeconds=100000" -u user:secret
curl "http://localhost:8090/lurker/qa/ProcessCpuLoad?to=9999999999999&from=1460356971000&scaleMilliSeconds=100000" -u user:secretConfiguration
Service configuration
The following configuration keys can be used in the main configuration file (%CONFIG_PATH/application.yml ) or as Docker arguments ( e.g. --storage.useMongo=false).
General service configuration possibilities are described at the configurations main page.
|
Key |
Default |
Explanation |
|
security.user.password |
secret |
Password for the default "user" for authentication against Lurkers REST API |
|
storage.useMongo |
false |
Possibility to switch between in-memory and MongoDB storage. If MongoDB is configured, measures are written into database lurker |
|
storage.mem.maxElements |
500000 |
Maximum number of measured values to store in memory; oldest elements are overwritten (FIFO). The number of data depends on the activated mbeans; these are stored every 10 seconds. |
|
storage.mongo.serverNames |
localhost |
A comma separated list of servers of the MongoDB installation. Each name can provide a port. Examples: 10.0.0.15 This value is only needed when storage.useMongo was set to true |
|
storage.mongo.userName |
|
Username for MongoDB connection; requires authentication to be set up in MongoDB |
|
storage.mongo.password |
|
Password for MongoDB connection; requires authentication to be set up in MongoDB |
|
storage.mongo.authDB |
admin |
Name of the authentication database in MongoDB |
|
storage.mongo.useSSL |
false |
Set to TRUE to enable SSL connection to MongoDB |
|
requestTimeout |
50000 |
Request timeout (ms) when collecting data from other monitoring nodes |
|
tomcat.url |
|
URL to a Tomcat container where the jolokia.war is installed; This will parse JMX values provided by this tomcat container and provide them over a REST interface across the network. This way, also remote host values will be accessible in Lurker. Jolokia Jolokia must be installed as jolokia.war - remove any version number from the war file before copying it to webapps folder! |
|
jmx.host jmx.port |
localhost 13991 |
Host and port of local JMX access. JMX is a Java technology that supplies tools for managing and monitoring applications , system objects, devices and service-oriented networks. Those resources are represented by objects called MBeans (for Managed Bean ). |
|
mbean.names |
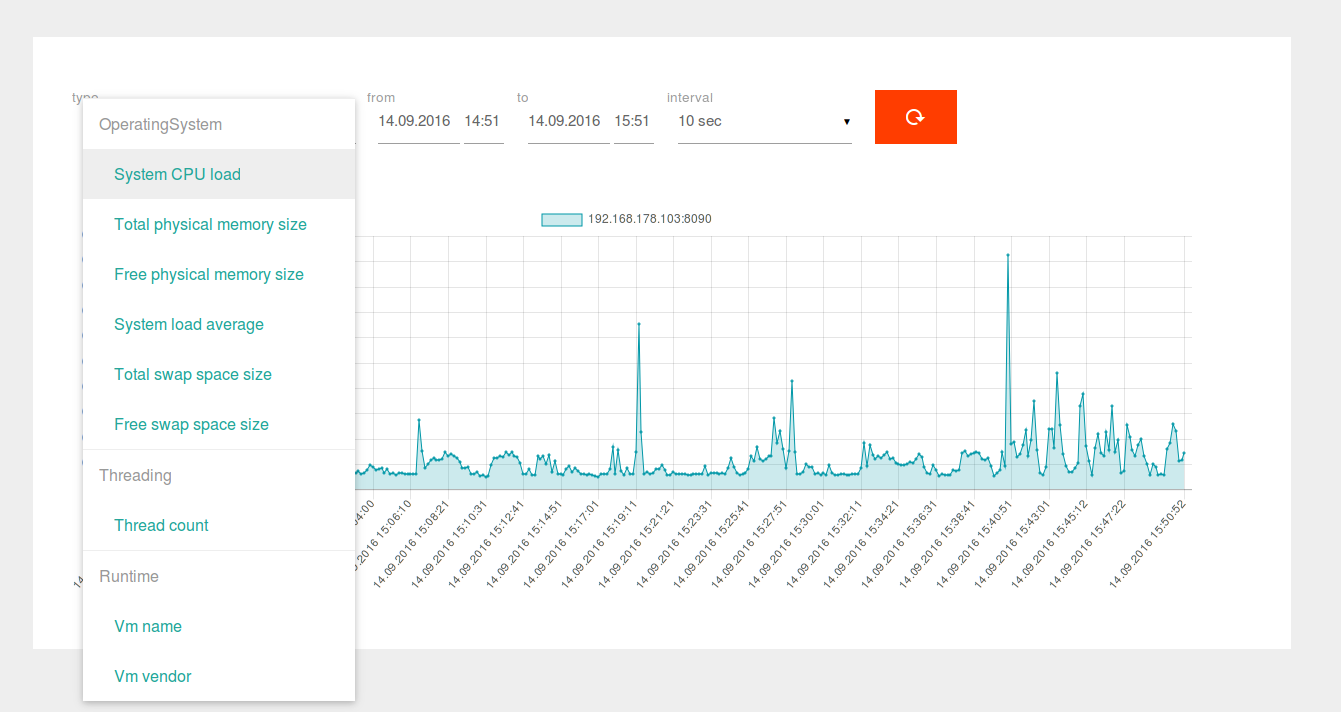
- java.lang:type=OperatingSystem - java.lang:type=Runtime,java.lang:type=Threading |
Provides a yaml list of MBeans which can be queried and stored in Lurker. Since the available quantity of JMX values differs between JAVA applications, the default value lists only two common MBean names. Available MBean names can be found using the /types rest method |
Dashboard configuration
To show monitoring values in the Dashboard, the /etc/apiomat/apiomat.yaml file has to be updated with the username/password settings of Lurker:
|
Key |
Default |
Explanation |
|
monitoring.user |
user |
Default username of Lurker |
|
monitoring.password |
secret |
Default password of Lurker |
|
monitoring.discoveryServiceURL |
localhost:8500 |
URL to Consul service discovery |
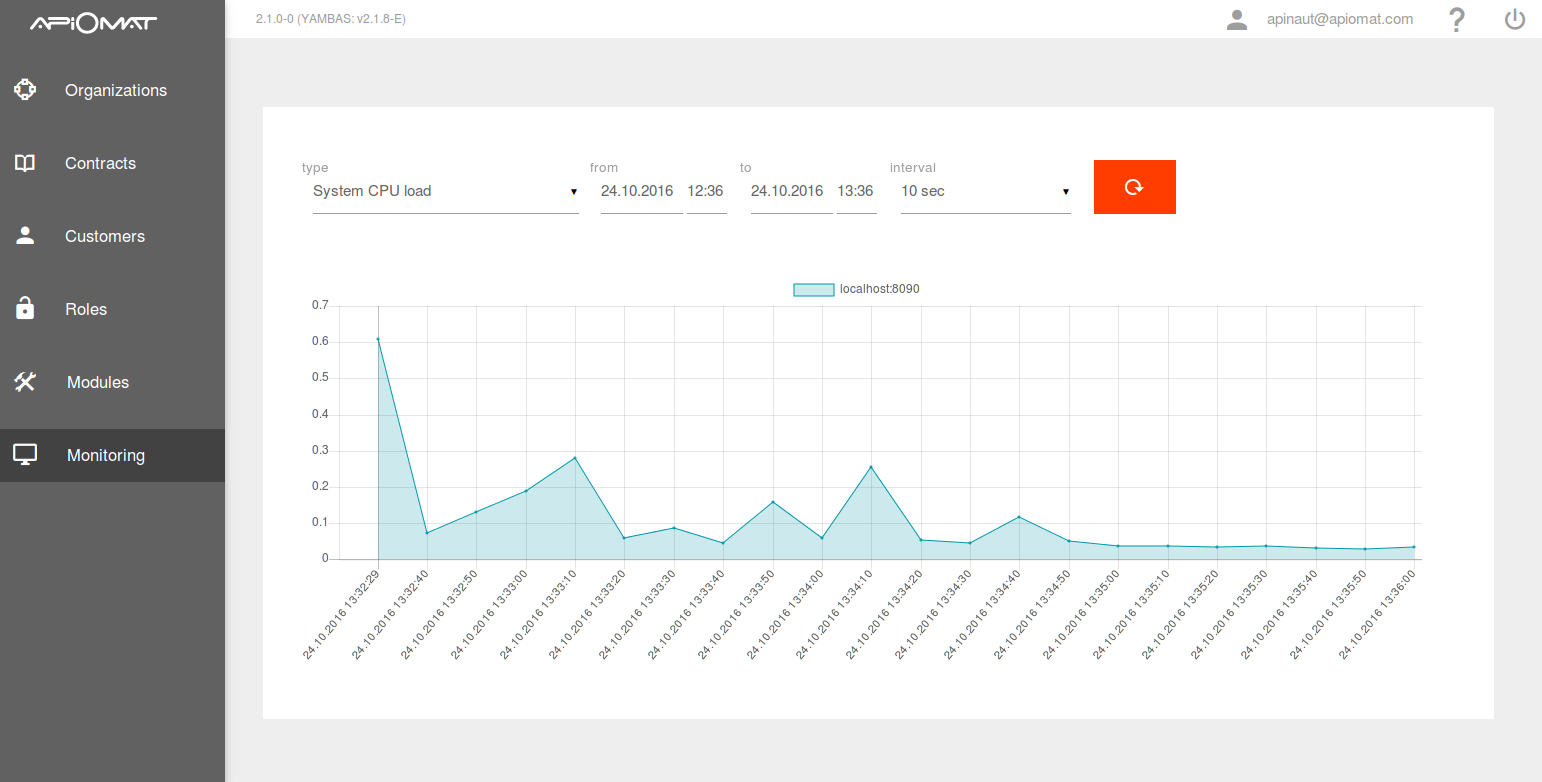
When the monitoring settings are configured, the option "Monitoring" is automatically added to the dashboard menu in the admin panel.
Cluster setup
-
Install and start Consul on each node
-
Install and start Lurker on each node
-
Check that all Lurker instances are running via Consul UI (http://<SERVERNAME>:8500)
-
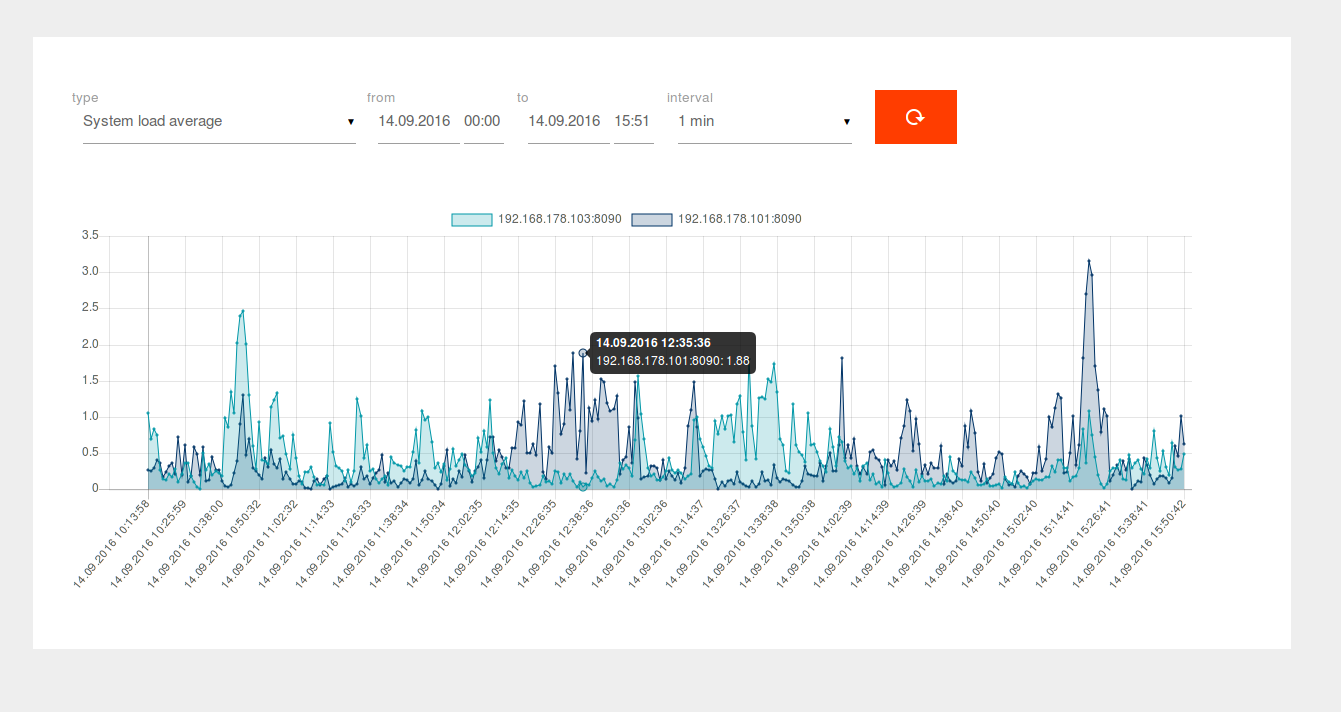
Log in to Dashboard as SuperAdmin and access the monitoring page. Measurements for each node will be selectable.
Logging
Logging is done to a separate logfile:
tail -f /var/log/apiomat/lurker.logPlease replace <LURKER_CONTAINER_ID> with your running container ID. You can list your running container using 'docker container list' command.
docker logs -f <LURKER_CONTAINER_ID>Please replace <LURKER_CONTAINER_ID> with your running container ID. You can list your running container using 'kubectl get pods' command.
kubectl logs -f <LURKER_CONTAINER_ID>All logs are written to Event manager.
Next steps
Install further microservices.