[Explorer] Installation
Introduction
The Explorer service provides a central UI for all accessible REST interfaces of ApiOmat. The UI is based on Swagger UI and provide a user friendly way to interacts with all REST resources.
Explorer retrieve service information from the available Consul discovery. It use these information to query every of the available services (YAMBAS, all its modules and micro-services) in order to generate a single OpenAPI specification :

As default, Explorer service will be available under the following :
|
Port |
8094 |
|
Context path |
/apidocs |
|
Host |
This service is included in YAMBAS until version 3.2. Afterwards, it needs to be installed by hand or via ApiOmat Meta Packages.
If this service were to be deployed as a WAR inside a YAMBAS Tomcat without Consul installed, please make sure that you provide the VM argument in 'aom-yambas' file to disable Consul as described in YAMBAS configuration.
Application-specific API Docs
The Explorer service also provides an application-specific API documentation which already contains the application name, the module name and the data model name of all available REST endpoints.
One of the advantages of the application-specific apidocs is that you have quick access to your available data model endpoints to manipulate your application data.
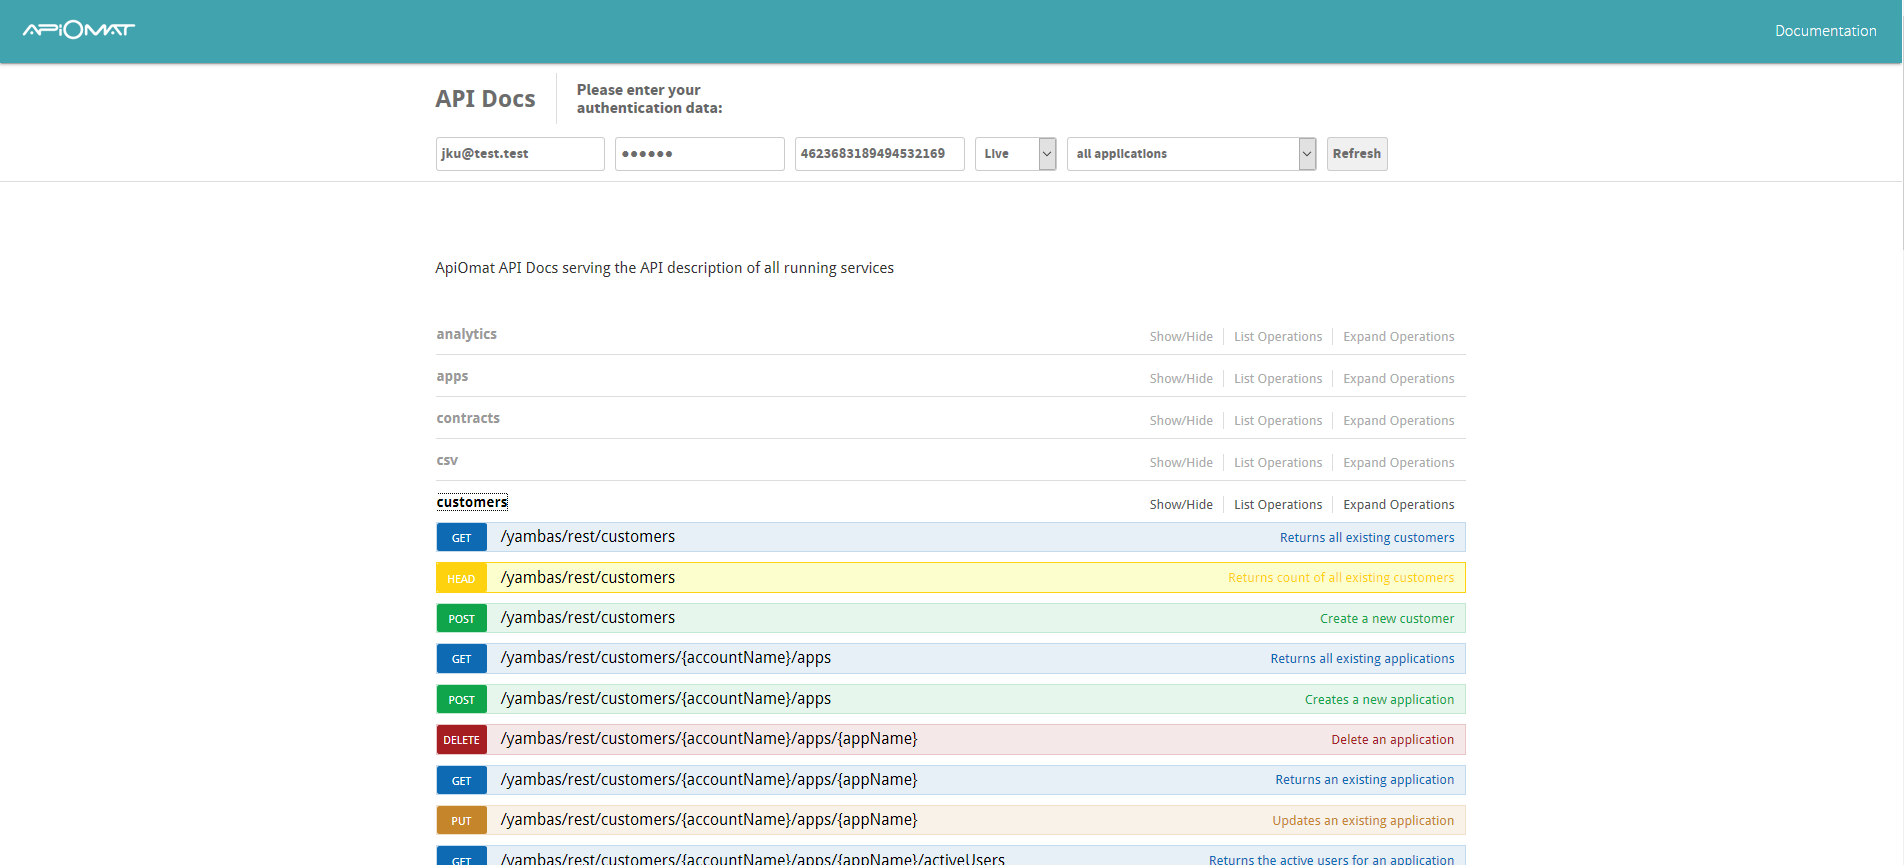
The generic apidocs view is still available by selecting "all applications" from list:
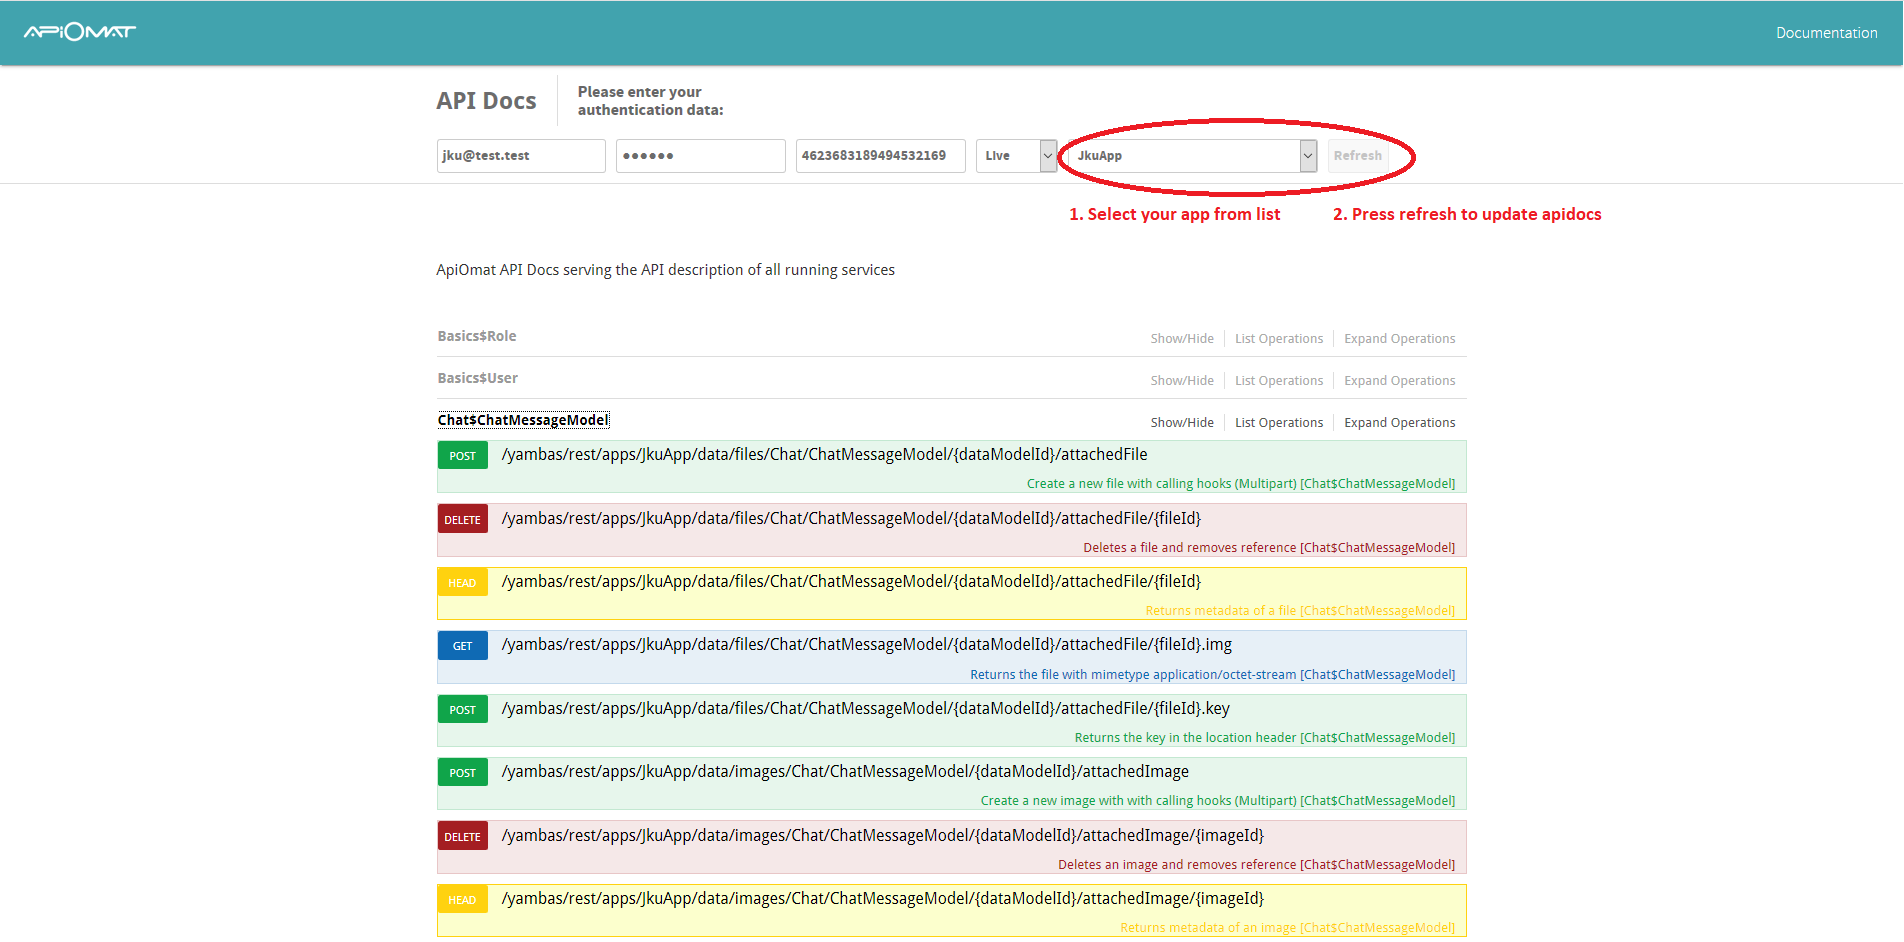
To access the application specific apidocs you simply fill in your credentials, select your application from list and click on the refresh button:
OpenAPI 2.0
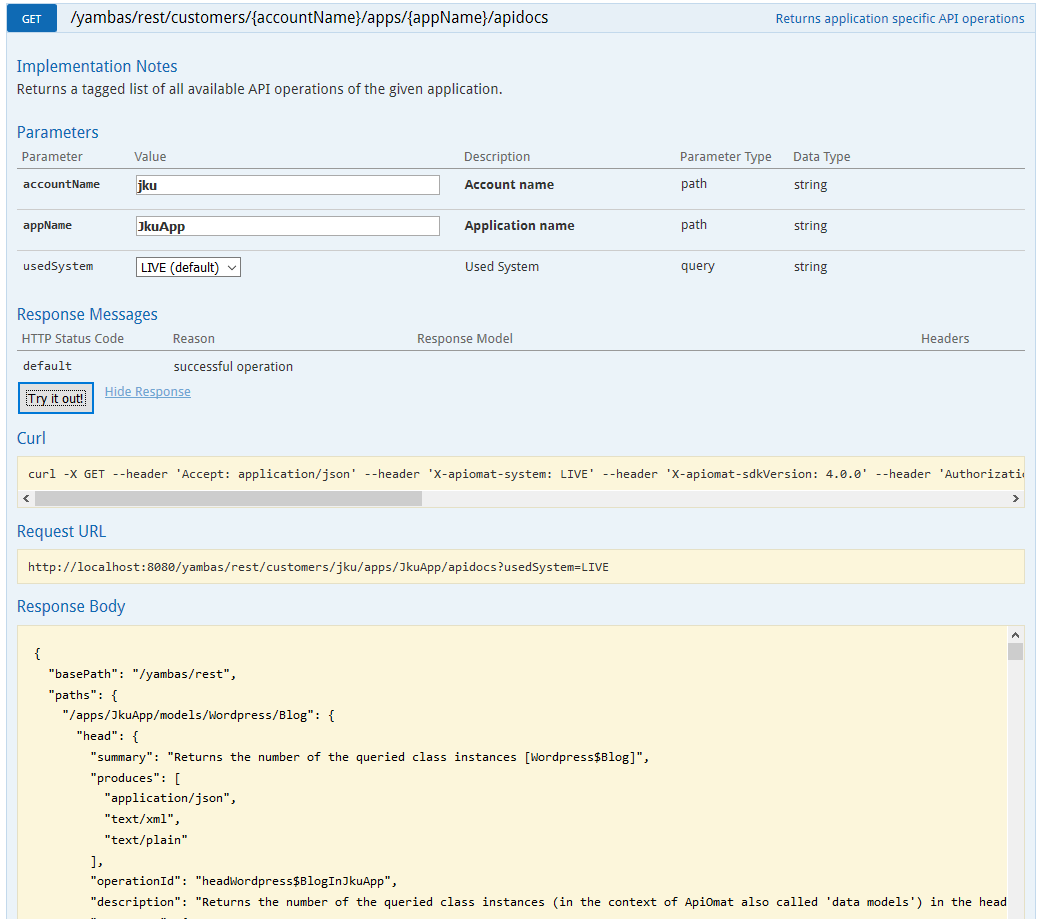
The application-specific apidocs are based on a generated OpenAPI 2.0 JSON which is accessible via following REST endpoint:
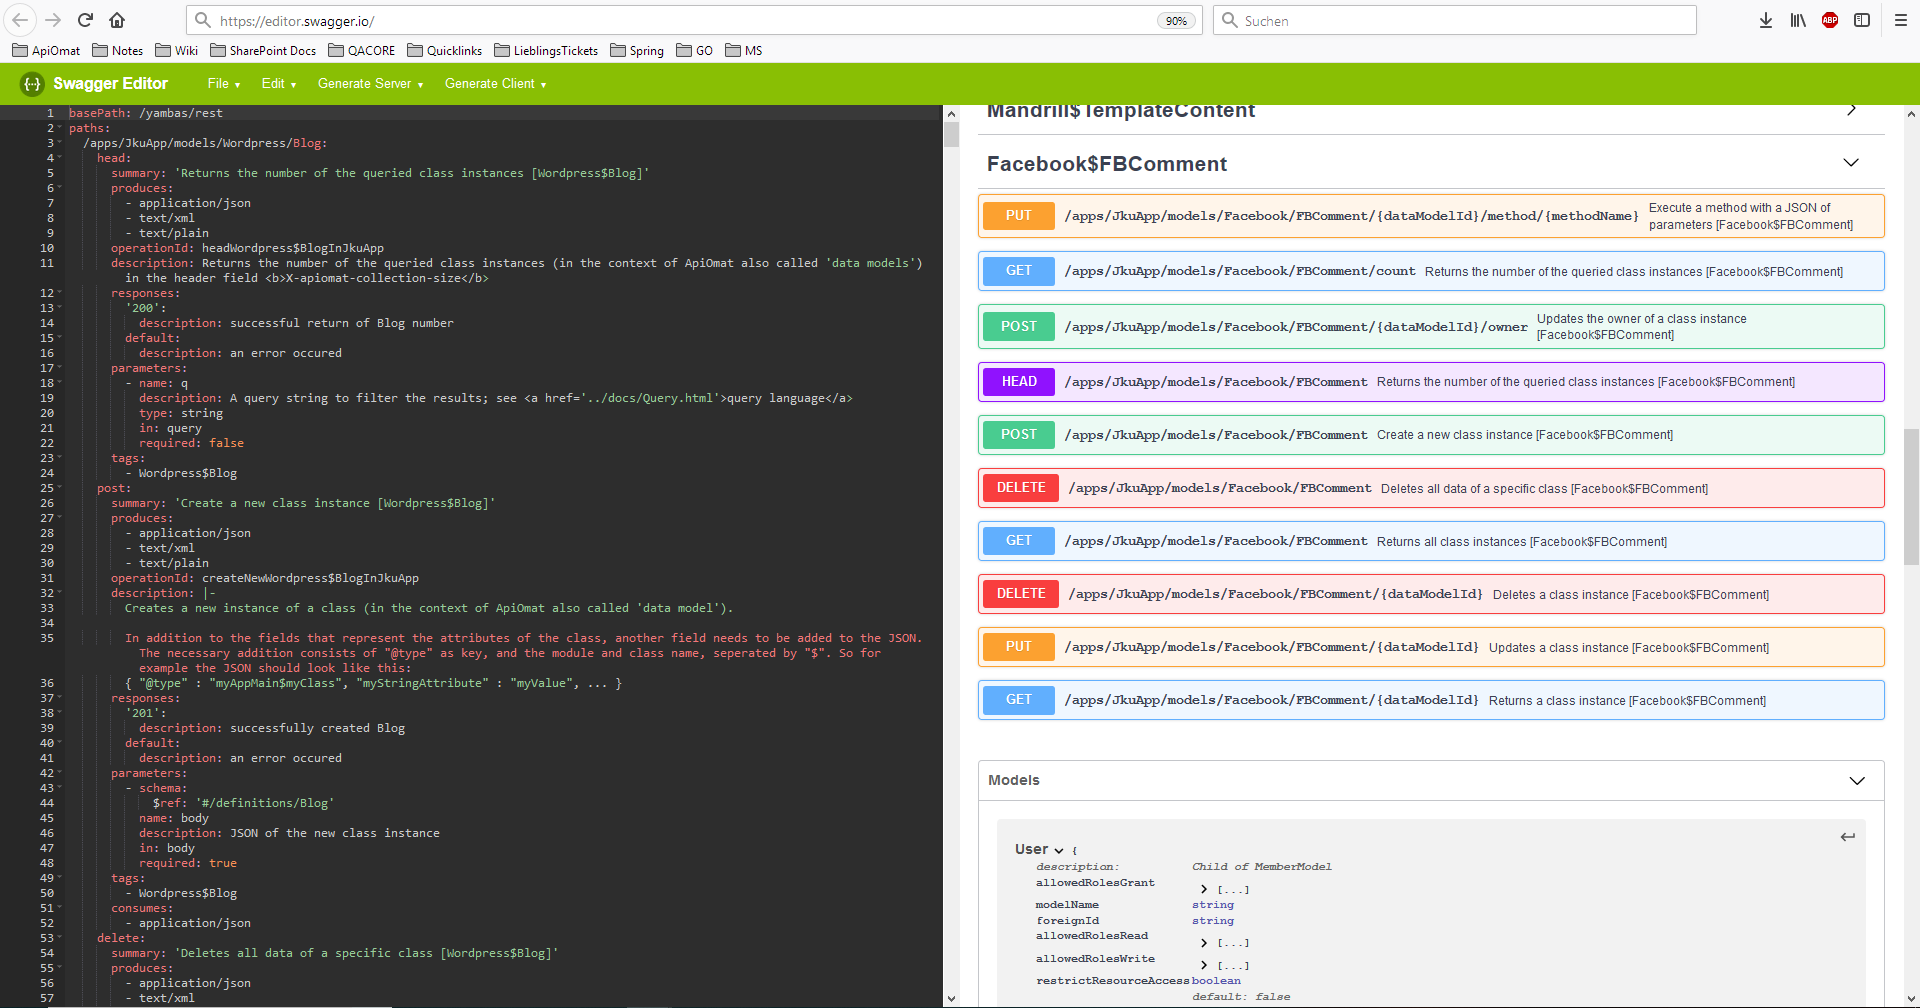
You may use the online swagger editor (https://editor.swagger.io) to view the OpenAPI document including all available REST endpoints of your application and the defined endpoint models:
Prerequisites
Open the following port in the firewall to other ApiOmat nodes:
-
8094 (HTTP)
Installation of Consul is required!
Installation of AdoptOpenJDK is required when not using Docker!
System requirements
The following instance configurations are recommended.
|
Size |
CPU |
Memory |
Disk |
Typical Cloud Instance Types |
|
All |
2 core |
1 GB RAM |
500 MB |
AWS: t2.medium |
|
|
|
|
|
Azure: Standard_ B1MS |
Installation
USERNAME, PASSWORD, and TOKEN values are provided per customer from ApiOmat.
# Install the repo keywget -O - https://repo-int.apiomat.com/yambas/rest/web/Key/LIVE/apiomat-archive-keyring.asc | sudo apt-key add -# Add the repositoryecho "deb https://<USERNAME>:<PASSWORD>@repo.apiomat.com/yambas/rest/web/Repo/LIVE/deb ./" | sudo tee /etc/apt/sources.list.d/apiomat.list# Update APT and installapt-get updateapt-get install -y aom-explorerservice explorer start# Add the repositoryecho "[apiomat]name=ApiOmatbaseurl=https://<USERNAME>:<PASSWORD>@repo.apiomat.com/yambas/rest/web/Repo/LIVE/rpmgpgcheck=0enabled=1" > /etc/yum.repos.d/apiomat.repo# Installyum -y --nogpgcheck install aom-explorerservice explorer start# Add the repositoryzypper addrepo --no-gpgcheck https://repo.apiomat.com/yambas/rest/web/Repo/LIVE/suse?token=<TOKEN> "ApiOmat"# Refresh zypper and installzypper refreshzypper --no-gpg-checks --non-interactive install aom-explorerservice explorer start# Docker logindocker login -u <USERNAME> -p <PASSWORD># Store the following file and execute:docker-compose -f explorer.yml upexplorer.yml:
version: '3'services: explorer: image: apiomat/explorer:<VERSION> command: --spring.cloud.consul.enabled=false ports: - "8094:8094"# Docker loginkubectl create secret docker-registry regcred \ --docker-server=https://index.docker.io/v1/ \ --docker-username="<USERNAME>" \ --docker-password="<PASSWORD>" \ --docker-email="<MAIL>"# Store the following file and executekubectl apply -f explorer.ymlexplorer.yml:
---# Source: apiomat-explorer/templates/service.yamlkind: ServiceapiVersion: v1metadata: name: release-name-apiomat-explorer labels: app: apiomat-explorer chart: apiomat-explorer-1.1.0 release: "release-name" heritage: "Tiller"spec: ports: - name: http port: 8094 protocol: TCP type: NodePort selector: app: apiomat-explorer release: release-name---# Source: apiomat-explorer/templates/deployment.yamlapiVersion: apps/v1kind: Deploymentmetadata: labels: app: apiomat-explorer chart: apiomat-explorer-1.1.0 heritage: Tiller release: release-name name: release-name-apiomat-explorerspec: replicas: 1 selector: matchLabels: app: apiomat-explorer chart: apiomat-explorer-1.1.0 release: release-name template: metadata: labels: app: apiomat-explorer chart: apiomat-explorer-1.1.0 release: release-name spec: imagePullSecrets: - name: <regcred> containers: - name: apiomat-explorer image: docker.io/apiomat/explorer:1.1.0 command: - --spring.cloud.consul.enabled=false ports: - containerPort: 8094 name: ms-port resources: limits: memory: 1Gi requests: memory: 1Gi livenessProbe: httpGet: path: /apidocs port: 8094 initialDelaySeconds: 30 periodSeconds: 10 timeoutSeconds: 5 successThreshold: 1 failureThreshold: 6 readinessProbe: httpGet: path: /apidocs port: 8094 initialDelaySeconds: 5 periodSeconds: 10 timeoutSeconds: 5 successThreshold: 1 failureThreshold: 6 imagePullPolicy: Always securityContext: capabilities: { } privileged: false---# Source: apiomat-explorer/templates/ingress.yamlapiVersion: extensions/v1beta1kind: Ingressmetadata: name: release-name-apiomat-explorer labels: app: apiomat-explorer chart: apiomat-explorer-1.1.0 release: release-name heritage: Tillerspec: rules: - host: "explorer.example.domain" http: paths: - path: / backend: serviceName: release-name-apiomat-explorer servicePort: ms-port---# Source: apiomat-explorer/templates/requirements.yaml# Docker loginkubectl create secret docker-registry regcred \ --docker-server=https://index.docker.io/v1/ \ --docker-username="<USERNAME>" \ --docker-password="<PASSWORD>" \ --docker-email="<MAIL>"# We are using helm to deploy the yambas replicaset helm inithelm repo updatehelm repo add apiomat https://apinautengmbh.github.io/helm/helm fetch apiomat/apiomat-explorer # extract the archive (.tgz) and find the values.yml. Adjust the parameters as required. helm install apiomat/apiomat-explorer --name apiomat-explorer --values values.yaml-
Download file: https://repo.apiomat.com/yambas/rest/web/Repo/LIVE/aom-explorer-<VERSION>.zip?token=<TOKEN> and unzip to installation folder
-
Ensure that the path to your installed jdk\bin is set to the system-environment variable 'Path' (java.exe needs to be accessible for windows' system user!)
-
Open administrative console and execute
Explorer-<VERSION>.exe install
Explorer-<VERSION>.exe start
to install as service and start afterwards.
For a removal of the service, execute
Explorer-<VERSION>.exe uninstall
Configuration
General service configuration possibilities are described at the configurations main page.
This service has the following specific configuration values:
|
Name |
Description |
Example |
|
explorer.yambas-tomcat-fallback-url |
When Explorer is deployed as WAR inside the same Tomcat as yambas, this is the base URL for reaching yambas (depends on Tomcat's settings.xml). By default (when no value is set here) three URLs are tried:
Redirects are NOT followed! |
http://localhost:8000 |
When Explorer is deployed as WAR inside the same Tomcat as YAMBAS, you can either change the configuration in "<TOMCAT_PATH>/webapps/explorer/WEB-INF/classes/application.yml" or, especially when running in Docker, via environment variable, for example "EXPLORER_YAMBAS-TOMCAT-FALLBACK-URL".
Logging
Logging is done to a separate logfile:
tail -f /var/log/apiomat/explorer.logPlease replace <EXPLORER_CONTAINER_ID> with your running container ID. You can list your running container using 'docker container list' command.
docker logs -f <EXPLORER_CONTAINER_ID>Please replace <EXPLORER_CONTAINER_ID> with your running container ID. You can list your running container using 'kubectl get pods' command.
kubectl logs -f <EXPLORER_CONTAINER_ID>All logs are written to Event manager.
Next steps
Install further microservices.