Android Tutorial Push
In this tutorial we will write an app with the ability to receive push-messages. This includes the creating of a new Android app, enabling the gcm, preparing ApiOmat and finally doing some layouting and coding.
Creating a new Android App
First of all, open your desired IDE. We recommend using Android Studio, as the following parts are designed to work with this IDE.
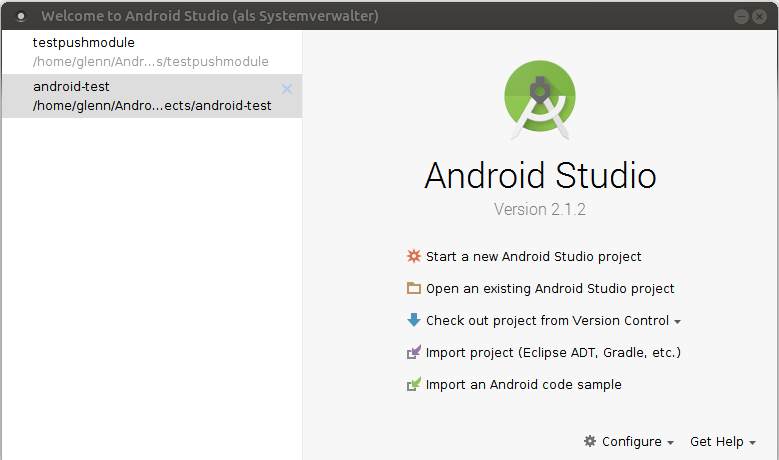
Within the startup dialog either choose Start A new Android Studio Project or if you want to enhance an existing project, choose Open an existing Android Studio Project, as shown in the figure below.
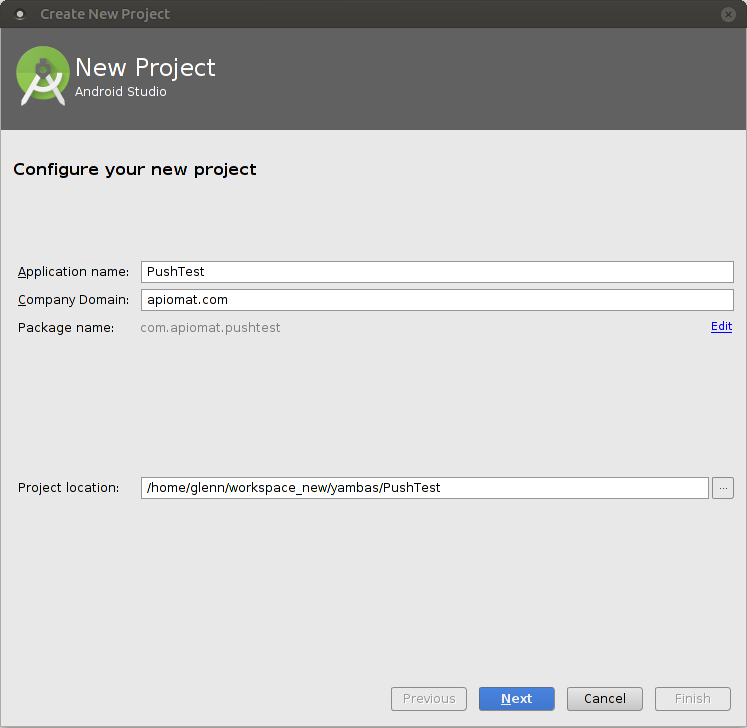
If you've decided to create a new project, you will have to setup a few basics as described by the next four screens. If you are using an existing one you can skip these instructions continuing with Enable GCM for your app. In the first step you will have to enter your company name and the name of the app. You will need these information later.
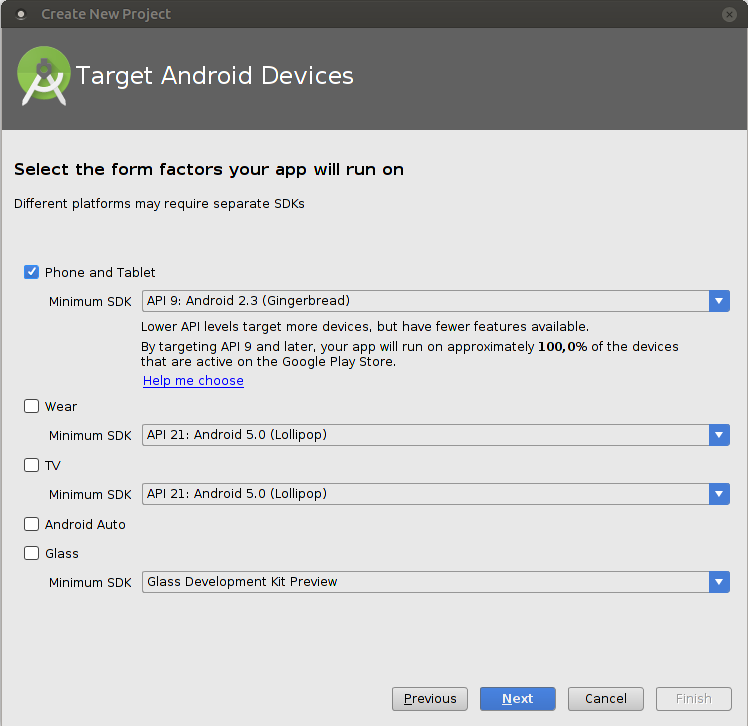
Next, you'll have to pick the android devices and minimum API levels you are targeting with your app. Please notice, that you'll need to choose at least API level 9 to be able to use Google's GCM.
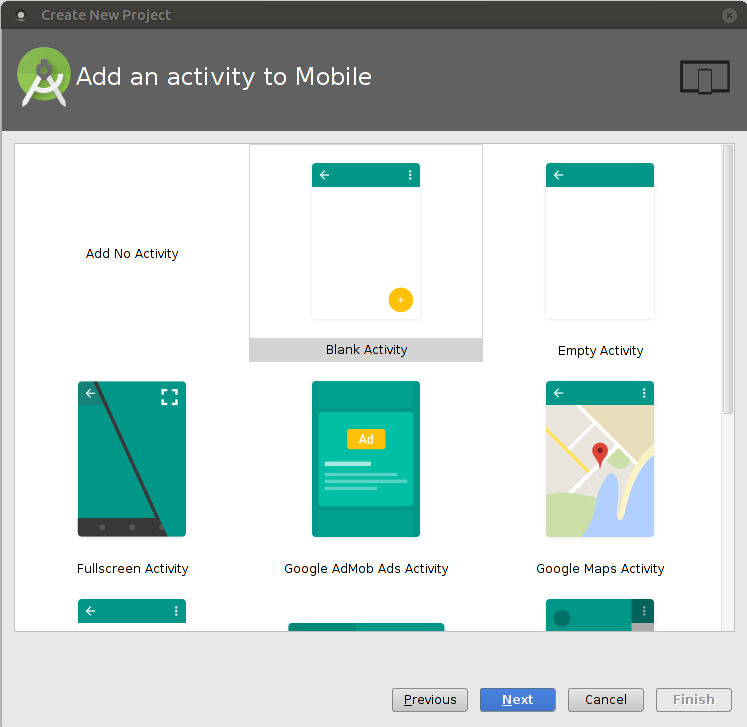
Further on, you will have to decide which kind of activity your app initially should contain. For this tutorial a Blank Activity will do.
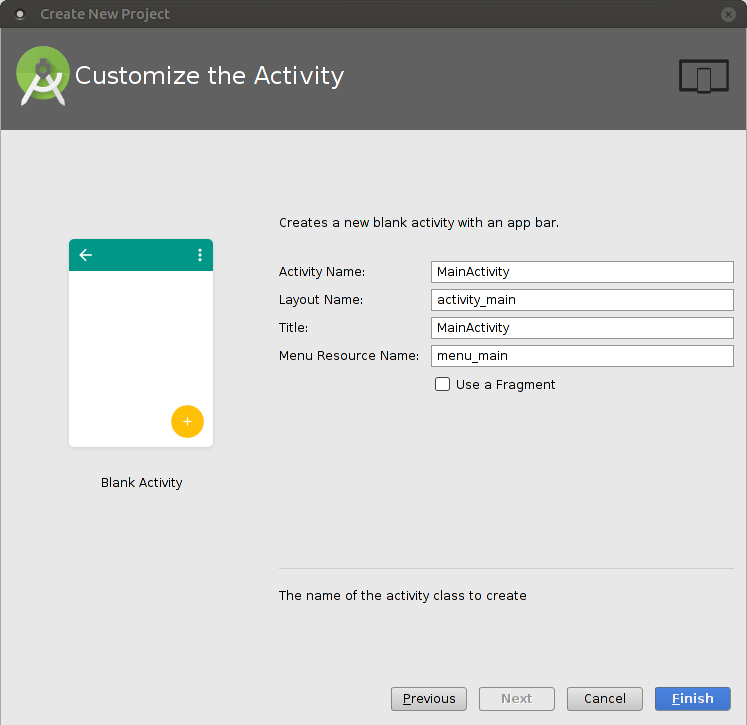
Finally, add a name for your activity and your layout, respectively the activity's title and the layout's file name. As it plays a subordinate role for our use case, just keep the defaults and finish creating the project by clicking the according button.
As we are going to use the Google Cloud Messaging Service, we will have to obtain a server API key. Therefore Google provides a pretty simple assistant, as you can see below.
Enable GCM for your app
Please note that a Google account is required in order to enable the GCM service.
Go to the Enable Google Services for your app section of Google's developers site.
As shown in Figure 01: Create or choose an app you will have to enter your app's name and the corresponding package name. Please make sure that these values are matching those of your app's manifest.
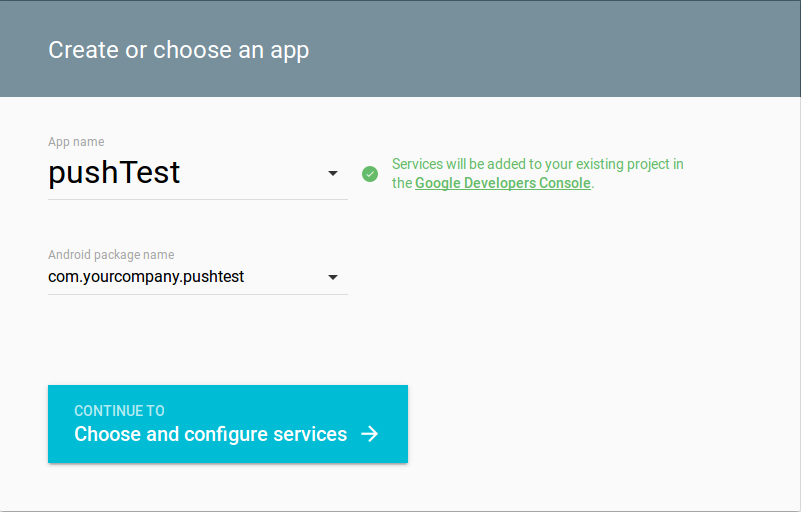
Figure 01: Create or choose an app
Now you can proceed choosing and configuring your app's services by clicking the button at the bottom.
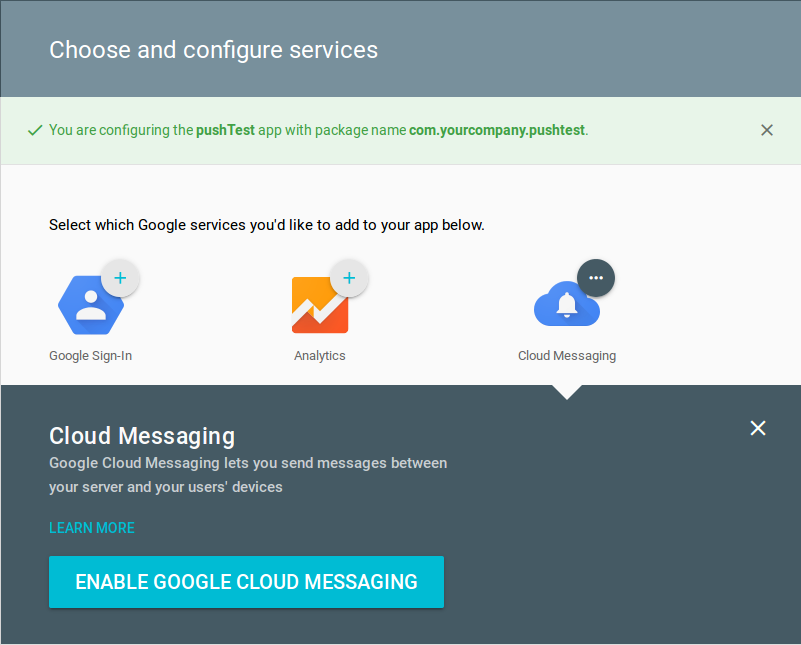
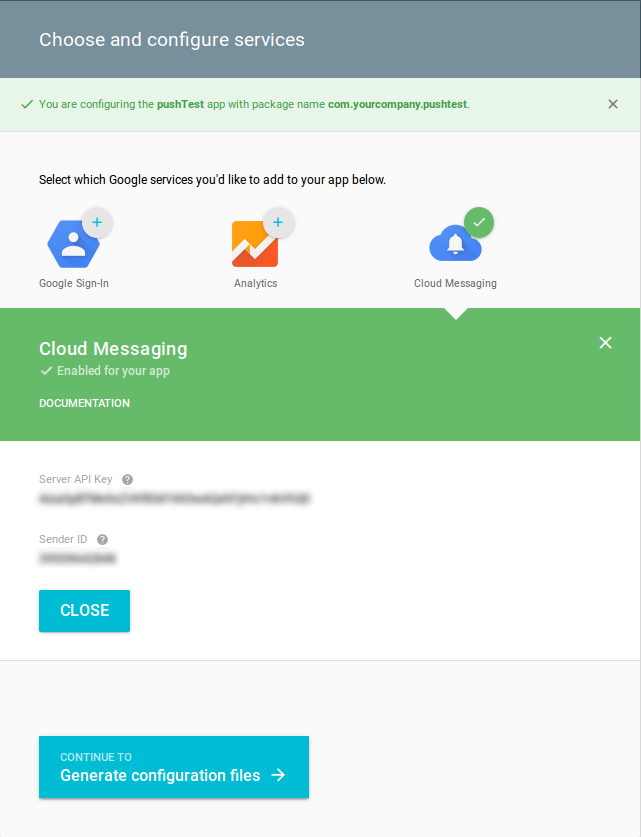
You can activate other services in addition to cloud messaging as you like, as shown in Figure 02: Choose and configure services.
By clicking the button at the bottom again, you will enter the confirmation, where you can see your Server API Key.
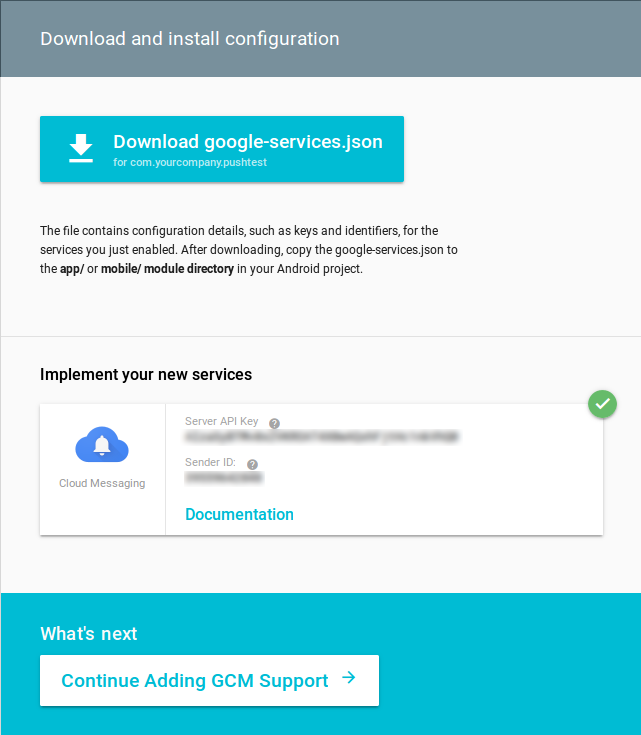
Instead of copying and pasting, you can use the generated config file. Simply click the button at the bottom one more time.
Now you'll find a download button (Download google-services.json) by which you can download a file including the generated values to easily add them to your project in the project's app-folder.
Setting up the Backend
1.Log into your account. If you don‘t have an account already, simply register by clicking "Not having an account yet?”.
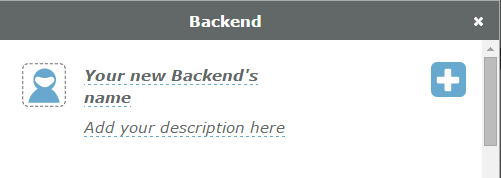
2.You are now on the dashboard. If you haven‘t created an app yet, you will be asked to name and describe your first app. In our example the app is called “Push”. For your app, though, you should use a unique name.
3.On the first dashboard page you will see all available modules. First select the Push Module by clicking “+” right next to the name of the module.
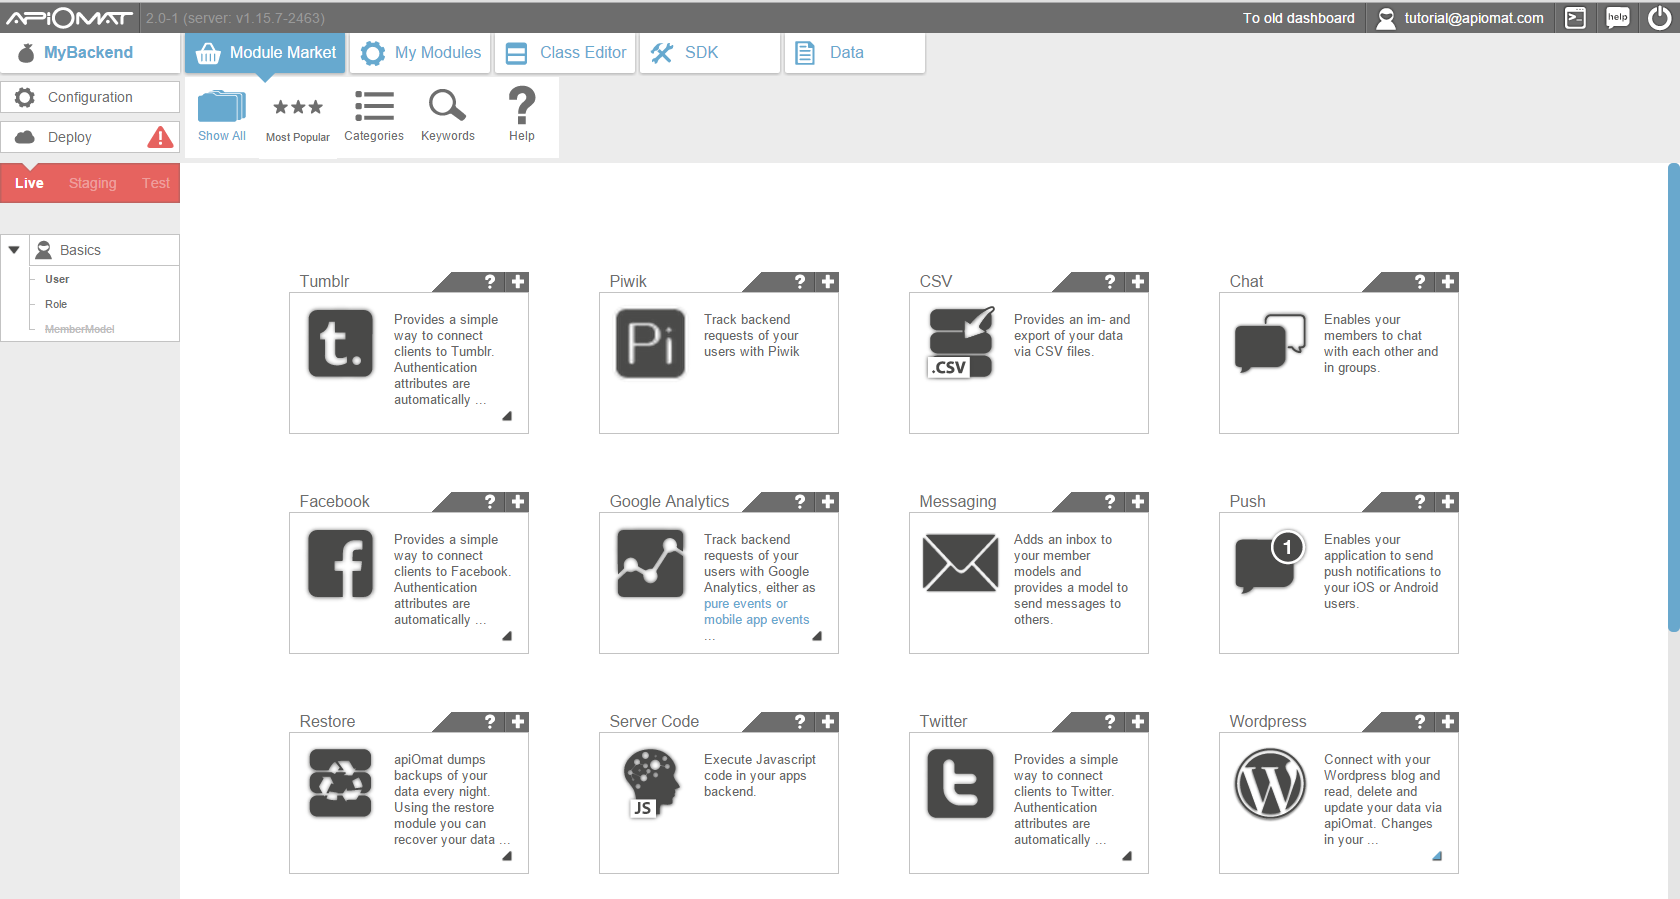
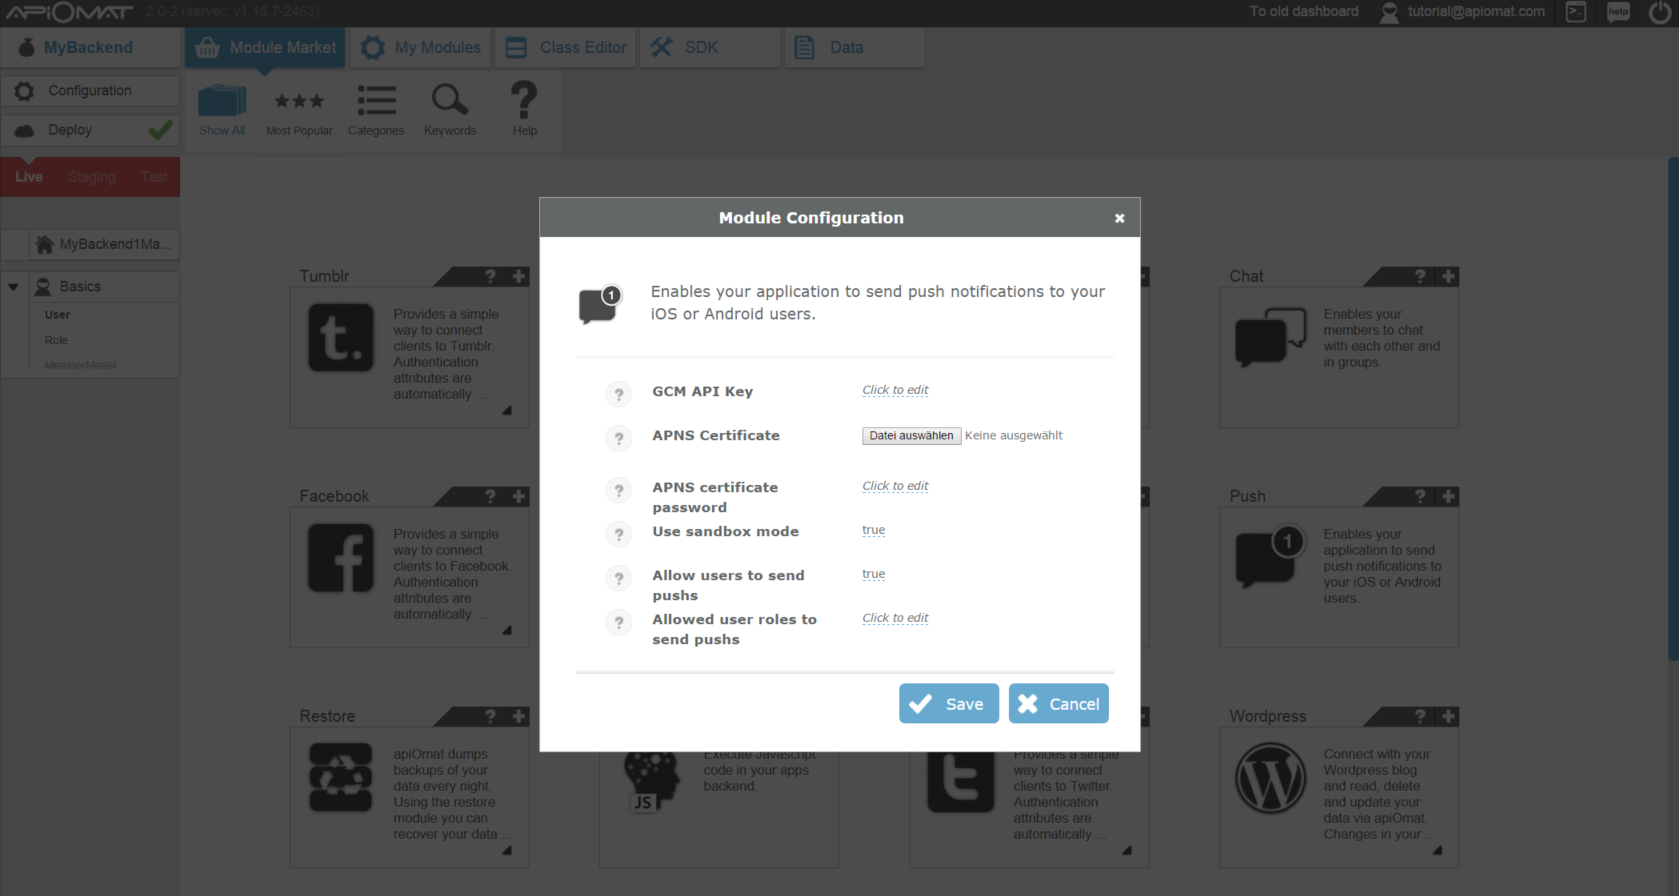
4. A pop-up with an input mask will appear. Insert your GCM API project key and confirm with “OK”.
5. To create the backend click “Deploy”.
6. Switch to the tab “SDK”. You can download each of the SDKs we offer here.
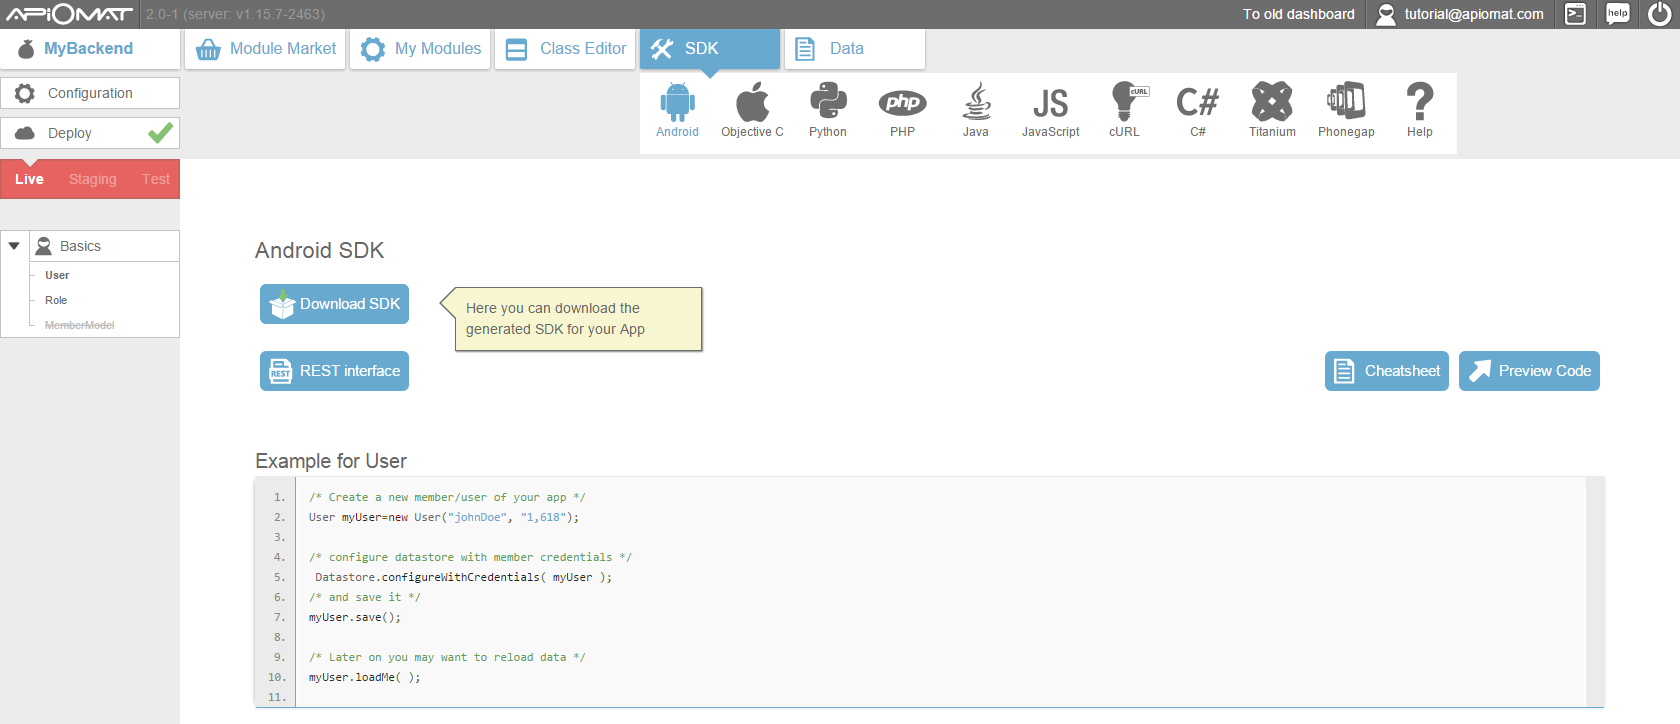
7. For our usecase we will need the SDK for Android. To download, simply click on the button “Download SDK”. This downloaded .ZIP file contains all classes and resources you'll need. Unpack the .ZIP file, saving it somewhere on your hard disk. You are finished with the dashboard for now.
9. Open the folder containing the unpacked .ZIP file within the file manager.
10. Copy both of the folders into the “src” folder (source) of your android project. All backend work is done now and we can start programming the frontend.
Configure your app
Now we need the configuration file we downloaded while Enabling GCM for our app. Simply copy this file into the app-Folder of your app-project. As this file is intended to be parsed by the Google Services plugin for Gradle, we have to install this plugin first. This is done by adding a dependency into your gradle files.
-
insert the following line into the build.gradle file in the root folder of your project.
classpath 'com.google.gms:google-services:2.0.0-alpha6'
2. add the plugin into the build.gradle file in the app folder of your project
apply plugin: 'com.google.gms.google-services'
In addition to the GCM API, the Google Play Services are required. They are added likewise. But previously we have to install the Play Services. Therefore open the SDK Manager, choose the tab SDK Tools and install the latest version of the Google Play Services. Afterwards add the dependency the your applications build.gradle (the one in your app folder)
dependencies { compile "com.google.android.gms:play-services-gcm:8.3.0"}Defining the layout
For being able to trigger the gcm registration and displaying received push messages, we have to define a simple layout, as shown below. The two most important elements are a TextView, having the id txt_push and a Button identified by btn_push. We will need those ids later.
<?xml version="1.0" encoding="utf-8"?><LinearLayout xmlns:android="http://schemas.android.com/apk/res/android" xmlns:app="http://schemas.android.com/apk/res-auto" xmlns:tools="http://schemas.android.com/tools" android:layout_width="match_parent" android:layout_height="match_parent" android:fitsSystemWindows="true" android:orientation="vertical" tools:context="com.apiomat.push.MainActivity"> <android.support.design.widget.AppBarLayout android:layout_width="match_parent" android:layout_height="wrap_content" android:theme="@style/AppTheme.AppBarOverlay"> <android.support.v7.widget.Toolbar android:id="@+id/toolbar" android:layout_width="match_parent" android:layout_height="?attr/actionBarSize" android:background="?attr/colorPrimary" app:popupTheme="@style/AppTheme.PopupOverlay" /> </android.support.design.widget.AppBarLayout> <TextView android:id="@+id/txt_push" android:layout_width="wrap_content" android:layout_height="wrap_content" android:paddingTop="50dp" android:layout_gravity="center" android:text="No message recevied yet." /> <Button android:id="@+id/btn_push" android:layout_marginTop="20dp" android:text="prepare" android:layout_width="wrap_content" android:layout_height="wrap_content" android:layout_gravity="center"/></LinearLayout>Writing Code
At first we do need a service, handling the gcm registration. We will instantiate this service if no registration token was found. Within the method onHandleIntent we save the registration token to shared preferences and create a new ApiOmat user containing this token. Finally we save this user.
public class RegistrationIntentService extends IntentService{ private static final String TAG = "RegIntentService"; public static final String APIOMAT_PREFERENCES = "APIOMAT_PREFERENCES"; public static final String APIOMAT_PREFERENCES_GCM_TOKEN = "GCM_TOKEN"; public RegistrationIntentService() { super(TAG); } @Override public void onHandleIntent(Intent intent) { try { final InstanceID instanceID = InstanceID.getInstance(this); final String token = instanceID.getToken(getString(R.string.gcm_defaultSenderId), GoogleCloudMessaging.INSTANCE_ID_SCOPE, null); final SharedPreferences prefs = this.getSharedPreferences(APIOMAT_PREFERENCES, this.MODE_PRIVATE); final SharedPreferences.Editor editor = prefs.edit(); editor.putString(APIOMAT_PREFERENCES_GCM_TOKEN, token); editor.commit(); createUser(token, this); } catch (Exception e) { Log.e(TAG, e.getMessage()); } } public static void createUser(String token, final Context ctx) { final User user = new User(); user.setUserName("myUser"); user.setPassword("myPassword"); user.setRegistrationId(token); Datastore.configureWithCredentials(user); user.saveAsync(new AOMEmptyCallback() { @Override public void isDone(ApiomatRequestException exception) { Toast.makeText(ctx, "Registration sucessful", Toast.LENGTH_SHORT).show(); } }); }}
We also need a service handling a server side token refresh. Simply create a file called InstanceIDService.java and paste the code below.
public class InstanceIDService extends InstanceIDListenerService{ private static final String TAG = "MyInstanceIDLS"; @Override public void onTokenRefresh() { final Intent intent = new Intent(this, RegistrationIntentService.class); startService(intent); }}
The last service handles the reception of push messages. In case of a message being received, we send a broadcast, that will be handled in our main activity and show it in our text view.
public class GCMPushReceiverService extends GcmListenerService{ public static final String INTENT_ID = "GCMIntent"; public static final String INTENT_DATA_ID = "GCmIntentData"; private static final String TAG = GCMPushReceiverService.class.getName(); @Override public void onMessageReceived(String from, Bundle data) { final String message = data.getString("payload"); final Intent intent = new Intent(INTENT_ID); intent.putExtra(INTENT_DATA_ID, message); getApplicationContext().sendBroadcast(intent); }}
Last but not least, we have to extend our main activity as shown below. If we do not have received a token yet, we will provide the function to request a new one by clicking the previously defined button. Otherwise we will hide the button and only show push messages in our text field.
public class MainActivity extends Activity{ private static final String REGISTRATION_SUCCESS = "RegistrationSuccess"; private static final String REGISTRATION_ERROR = "RegistrationError"; private BroadcastReceiver receiver; public TextView push_message; private Button push_button; private Context ctx; @Override protected void onCreate(Bundle savedInstanceState) { super.onCreate(savedInstanceState); setContentView(R.layout.activity_main); push_message = (TextView) findViewById(R.id.txt_push); push_button = (Button) findViewById(R.id.btn_push); ctx = this; receiver = new BroadcastReceiver() { @Override public void onReceive(Context context, Intent intent) { push_message.setText(intent.getStringExtra(GCMPushReceiverService.INTENT_DATA_ID)); } }; final IntentFilter filter = new IntentFilter(); filter.addAction(GCMPushReceiverService.INTENT_ID); registerReceiver(receiver, filter); final String token = this.getSharedPreferences(RegistrationIntentService.APIOMAT_PREFERENCES, MODE_PRIVATE).getString(RegistrationIntentService.APIOMAT_PREFERENCES_GCM_TOKEN, ""); if(token.isEmpty()) { push_button.setOnClickListener(new View.OnClickListener() { @Override public void onClick(View v) { final Intent intent = new Intent(ctx, RegistrationIntentService.class); startService(intent); } }); } else { push_button.setVisibility(View.INVISIBLE); } } @Override protected void onResume() { super.onResume(); } @Override protected void onPause() { super.onPause(); }}Asking for Permission
An Android app is not allowed to do anything, especially accessing the Internet, by default. To authorize our app to do this, we have to have it ask for permission. This happens in the Android Manifest.
1. Open the die AndroidManifest.xml in your app's root folder.
2. Add these lines immediatly after the <manifest [...]> tag:
<!-- App receives GCM messages.--><uses-permission android:name="com.google.android.c2dm.permission.RECEIVE"></uses-permission><!-- GCM connects to Google Services.--><uses-permission android:name="android.permission.INTERNET"></uses-permission><!-- GCM requires a Google account.--><uses-permission android:name="android.permission.GET_ACCOUNTS"></uses-permission><!-- Keeps the processor from sleeping when a message is received.--><uses-permission android:name="android.permission.WAKE_LOCK"></uses-permission>
3.Enter the following two permissions and within it‘s description replace “my_app_package” with the name of the package of your app:
<permission android:name="my_app_package.permission.C2D_MESSAGE" android:protectionLevel="signature"></permission><uses-permission android:name="my_app_package.permission.C2D_MESSAGE"></uses-permission>
4. Assign our GCMPushReceiverService as a child node of “application”. For details on this service please see section above.
<service android:name=".GCMPushReceiverService" android:exported="false" > <intent-filter> <action android:name="com.google.android.c2dm.intent.RECEIVE" /> </intent-filter></service>
5. In addition to the GCMPushReceiverService, we also need to add the InstanceIDService, which has to be added as a child node of "application" as well:
<service android:name=".InstanceIDService" android:exported="false"> <intent-filter> <action android:name="com.google.android.gms.iid.InstanceID"/> </intent-filter></service>
6. Eventually, we‘ll need a BroadcastReceiver, which also has to be a child element of “application”:
<service android:name=".RegistrationIntentService" android:exported="false"/>
Let’s go!
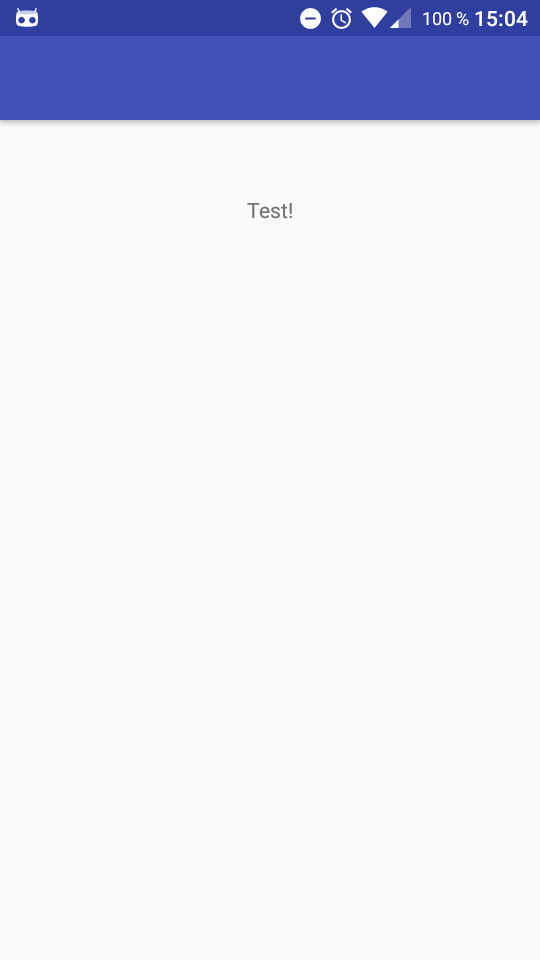
For testing we have send a push message from the dashboard within the app.
1. Start the app on your Android device.
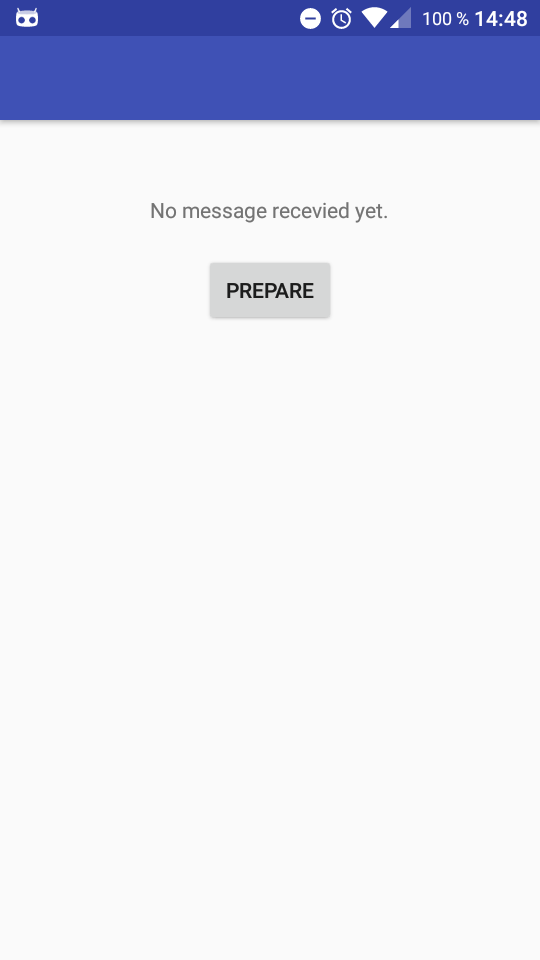
2. Press the button “Prepare”. A toast saying: “Registration successful” should emerge. The device is now registered at GCM.
3. Switch back to the dashboard of ApiOmat.
4. Click the tab My Modules and then the button “Push”.
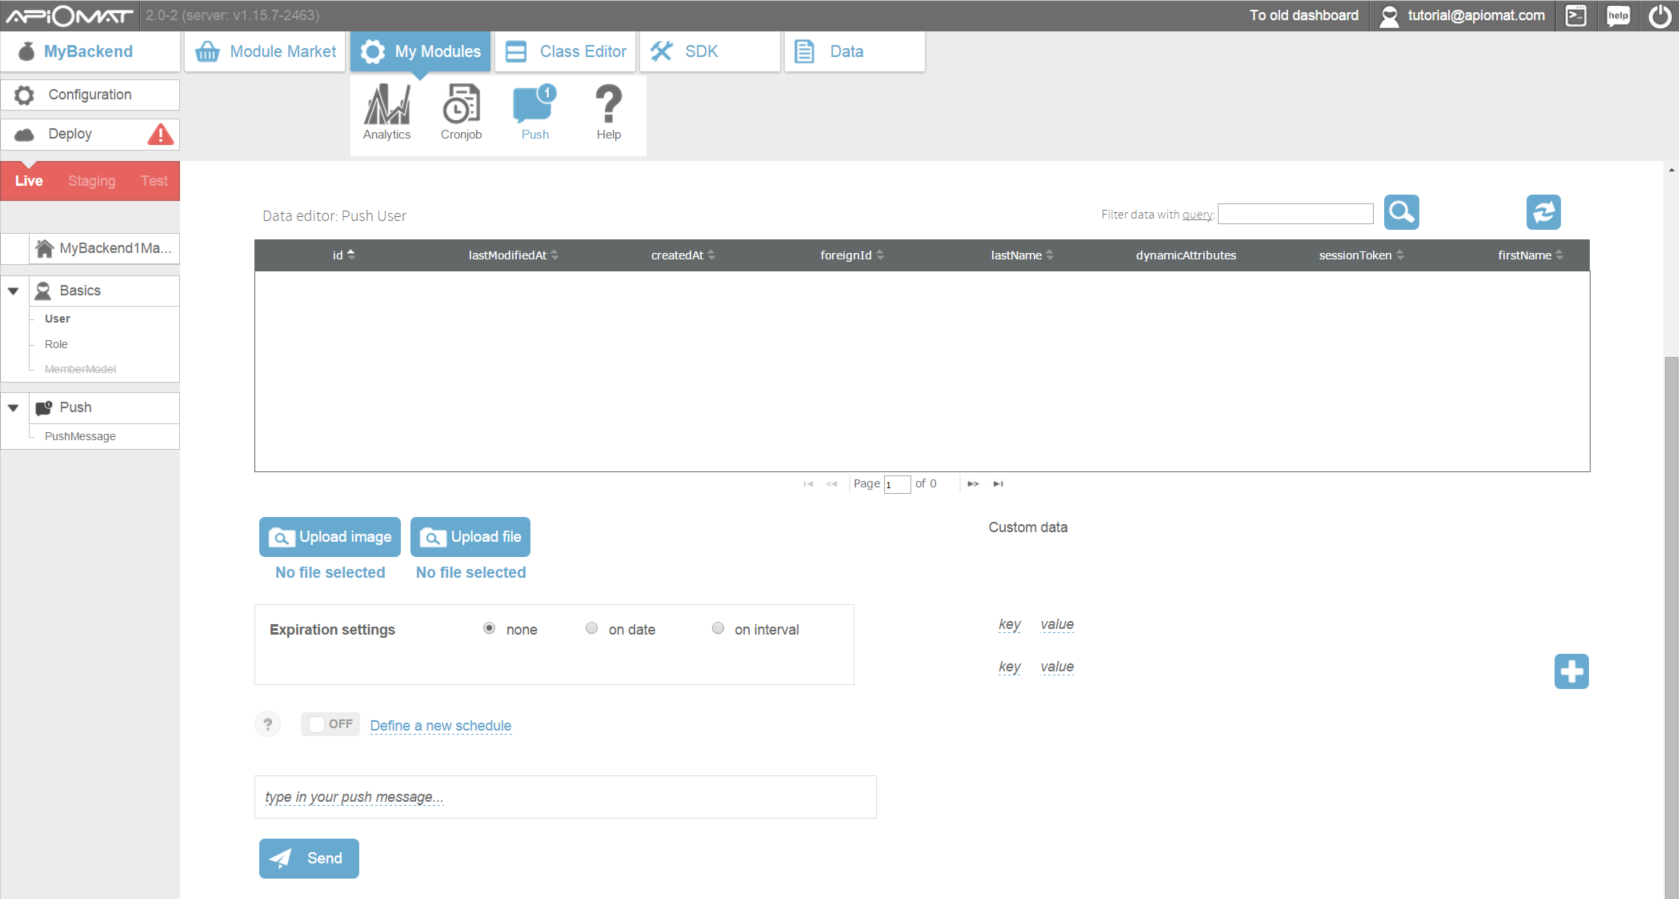
5. Click “Send”.
6. Check out your Android app. The text field should contain the push message you entered. In our case it was the message "Test!".