WebAppUploadModule
Content
Introduction
This module performs the following task:
-
Upload a web-frontend to the webhosting-module
-
Automatically put the current apiomat.js-file of the application into the filesystem of the web-fronted deployed on the webhosting-module.
The module works as an post-request as it modifies the content on the server.
The Module depends on the module "Webhosting"
Configuration
|
Parameter-Name |
Typ |
Example |
Explanation |
|
customer |
Query-Paramter |
klaus |
The name of one valid customer of this server has to be transmitted. |
|
jspath |
Query-Parameter |
webcontent/scripts/vendor/apiomat/ |
This indicates the path where the apiomat.js-file should be put into the filesystem of the webhosting-module. For example, let's say you have put your frontend into a zip-file named "webcontent.zip" and you would like to put the apiomat.js into the subfolder "scripts/vendor/apiomat/". Just put the name of the zip-file infront of this path to form "webcontent/scripts/vendor/apiomat/". |
|
- |
Binary-Data Body of Post |
webcontent.zip |
Your webfrontend compressed into a zip-file, transferred as binary data. |
The URL to reach the function is:
<host-base>/yambas/rest/modules/webappuploadmodule/<appname>/spec/upload?customer=<customer>&jspath=<jspath>Examples
Before using the module, you have to add it to your application via the dashboard.
The Example will be sent with the following parameters:
-
Server-Address: https://epdemo.apiomat.enterprises
-
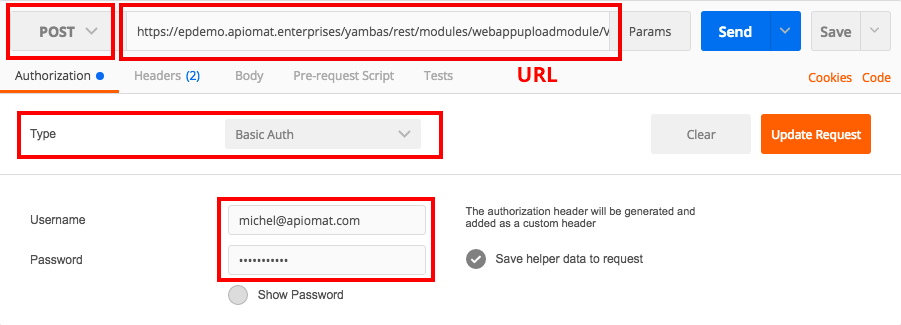
User-Name: michel@apiomat.com , Password: iAmAPassword
-
Application-Name: Vacation-App
-
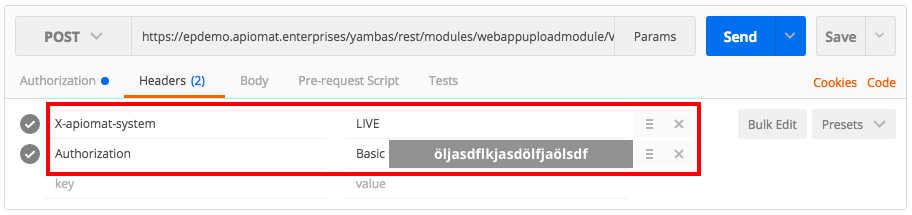
System: LIVE
-
Custer-Name: epdemo
-
File to upload: webcontent.zip
-
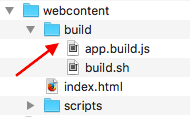
Path inside the webcontent.zip where the apiomat.js-File should be put: webcontent/build/
This adds up to the URL:
https://epdemo.apiomat.enterprises/yambas/rest/modules/webappuploadmodule/VacationApp/spec/upload?customer=epdemo&jspath=webcontent/build/Example with Postman
get Postman: https://www.getpostman.com/
1. Authorization
2. Set Headers:
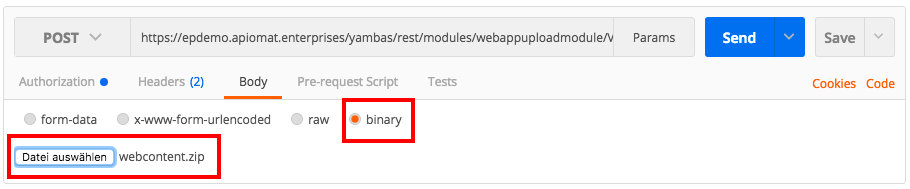
3. Set Body
Here you have to put in the .zip-File with your web-frontend as binary-data!
Example with Java
Using the Apache http-Client library: https://hc.apache.org/httpcomponents-client-ga/index.html .
String url = "https://epdemo.apiomat.enterprises/yambas/rest/modules/webappuploadmodule/VacationApp/spec/upload?customer=epdemo&jspath=webcontent/build/";String relativePathToWebfrontendZip = "META-INF/webcontent.zip";String username = michel@apiomat.com;String password = iAmAPassword;String apiKey = 123456789;String system = "LIVE";public void post() { InputStream payLoad = getClass().getResourceAsStream(relativePathToWebfrontendZip); PostMethod request = new PostMethod(url); String credentials = username + ":" + password; String encoded = new String(Base64.encodeBase64(credentials.getBytes("UTF-8")), "UTF-8"); requestMethod.setRequestHeader("Authorization", "Basic " + encoded); request.setRequestHeader("ContentType", "application/json"); request.setRequestHeader("x-apiomat-apikey", apiKey); request.setRequestHeader("x-apiomat-system", system); request.setRequestEntity(new InputStreamRequestEntity(payLoad)); try { this.client.executeMethod(request); } catch (IOException e) { e.printStackTrace(); } return request; }Confirm if upload worked
This step obviously is optional.
-
Download Filezilla to access the server via FTP ( https://filezilla-project.org/ )
-
Use Filezilla to connect to the FTP-Server by entering the admin-credentials of your server

-
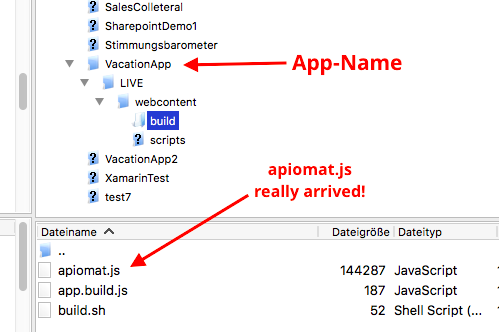
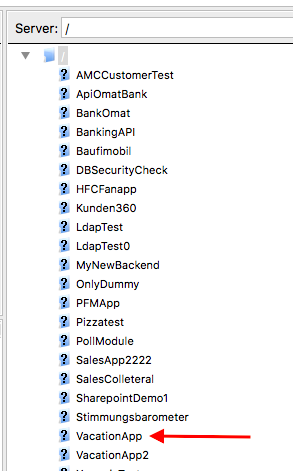
When connected succesfully, the right panel will show all applications currently deployed on this server. Search for your application
-
Open the folder of your application and navigate to the folder which you passed by the "jspath"-variable. There you should find the apiomat.js-file