Building the Start Screen
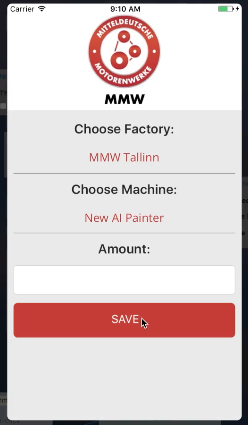
In this tutorial, we'll start building the app without a log-in screen to keep things simple and then add a login screen later. The first screen we'll create will look like the image below. The goal of the screen is fot the user to create a Summary, which contains a machine and factory that the users selects from a picker as well as an amount that the user enters into a text field.
Opening the screen editor
Every project in ApiOmat Studio has a default screen named "Start" that is displayed on the Project Map. By clicking on the screen name we can change it and if we double click on the screen element, we open the screen editor.

Setting the background color
To get started, we will set the background color. You do this by clicking on the background layer, clicking on the color box and using the color picker to select the perfect color.
Adding a box element and a logo
Now that the background is set, we will create the white box at the top of the screen and display our logo. Select the box tool on the left-hand menu and drag it across the screen, once the box is created we will edit its size and dimensions so it looks good on all of the preview screens.

Now we'll add our logo, we'll do so by clicking import image on the toolbar and dragging it onto our screen. To get the image directly in the middle, we will create a keyline at the center of the screen and align our image to the keyline.
Aligning the logo with a keyline
Keylines are lines that we can position on the screen and use to align various elements of our screen. Keylines help us ensure the app will be displayed appropriately across devices and help you position images and elements to an exact position. We'll use the keyline here to align our image exactly in the middle. The GIF below shows how you can align the image to a new keyline.
Adding and aligning text
Next we will add the text. Click on the add text element and drag it to the desired position on the screen. You can use keylines to align the text to a certain position. For the areas where the user will select data, we will add text boxes for now and replace them with data pickers later.
If our app displayed more data, we would want to be able to scroll through the form, while keeping our logo in a fixed position at the top of the screen. To do so, we can move items to the scroll flow layer. The scroll flow layer scrolls above the backgroud layer and below the screen layer. So if we add our text to the scroll flow, they will scroll beneath the MMW logo and the white background that are located in the foreground.
Adding a button
Finally we can add a button, simply drag and drop this onto your screen. Adjust the text. Buttons trigger events (save data, go to next screen, etc.) that we will define later.
Next Step
Now that we finished designing the start screen, we can move onto Building the List Screen.