[Bouncer] Installation
Introduction
With ApiOmat Bouncer, we introduce a service as an identity and access management solution. The service is based on Keycloak and helps you with the integration of third party authentication providers like LDAP, Active Directory and others.
The service provides a central point for authentication. When a user logs in with Bouncer, he obtains a JWT. A JWT is a token that is signed by Bouncer and includes information about the user. The JWT is included in every request as bearer authentication header and can be used to check the authorization within the services.
This page provides the steps to install and configure the Bouncer. For further functional information please refer to Bouncer's Usage documentation.
Overview
If configured correctly, Bouncer integrates nicely with other ApiOmat components.
A Bouncer installation contains different "containers" that are isolated from each other and each manage a set of users, credentials and roles. These containers are called realms.
In the ApiOmat context, there is one realm "Apiomat" and one realm for each App-Backend and system.
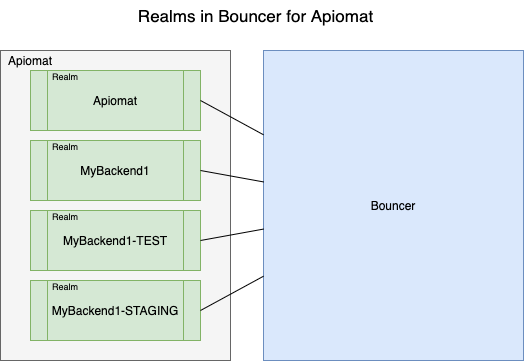
This reflects that every App-Backend (and system) has it's own users. ApiOmat will take care of creating and configuring the realm when you create a new App-Backend.
We ship our Bouncer with an extension, which is responsible for handling login requests according to ApiOmat customers, organizations and application users.
Installation
USERNAME, PASSWORD, and TOKEN values are provided per customer from ApiOmat.
Debian/Ubuntu
# Install the repo keywget -O - https://repo-int.apiomat.com/yambas/rest/web/Key/LIVE/apiomat-archive-keyring.asc | sudo apt-key add -# Add the repositoryecho "deb https://<USERNAME>:<PASSWORD>@repo.apiomat.com/yambas/rest/web/Repo/LIVE/deb ./" | sudo tee /etc/apt/sources.list.d/apiomat.list# Update APT and installapt-get updateapt-get install -y aom-bouncerservice bouncer startCentos/Oracle/RedHat
# Add the repositoryecho "[apiomat]name=ApiOmatbaseurl=https://<USERNAME>:<PASSWORD>@repo.apiomat.com/yambas/rest/web/Repo/LIVE/rpmgpgcheck=0enabled=1" > /etc/yum.repos.d/apiomat.repo# Installyum -y --nogpgcheck install aom-bouncerservice bouncer startSuse
# Add the repositoryzypper addrepo --no-gpgcheck https://repo.apiomat.com/yambas/rest/web/Repo/LIVE/suse?token=<TOKEN> "ApiOmat"# Refresh zypper and installzypper refreshzypper --no-gpg-checks --non-interactive install aom-bouncerservice bouncer startDocker Compose
# Docker logindocker login -u <USERNAME> -p <PASSWORD># Store the following file and execute:docker-compose -f bouncer.yml upbouncer.yml:
version: '3'services: postgres: image: postgres volumes: - postgres_data:/var/lib/postgresql/data environment: POSTGRES_DB: bouncer POSTGRES_USER: bouncer POSTGRES_PASSWORD: b0uncer networks: - proxy bouncer: image: "apiomat/bouncer:<version>" environment: DB_VENDOR: POSTGRES DB_ADDR: postgres DB_DATABASE: bouncer DB_USER: bouncer DB_SCHEMA: public DB_PASSWORD: b0uncer KEYCLOAK_USER: admin KEYCLOAK_PASSWORD: Pa55w0rd CONSUL_ENABLED: "true" CONSUL_URL: http://consul:8500/ REGISTRY_SERVICE_ID: bouncer REGISTRY_SERVICE_NAME: bouncer REGISTRY_SERVICE_HOST: <your-bouncer-hostname> REGISTRY_SERVICE_PORT: <your-bouncer-port> REGISTRY_HEALTHCHECK_URL: http://<your-bouncer-hostname>:<your-bouncer-port>/auth/realms/master/health/check networks: - proxy ports: - 8081:8080 - 9990:9990 - 8787:8787 depends_on: - postgresKubernetes
To obtain the latest manifest file, please contact the EASY ApiOmat support.
Windows
-
Download file: https://repo.apiomat.com/yambas/rest/web/Repo/LIVE/aom-bouncer-<VERSION>.zip?token=<TOKEN> and unzip to installation folder
-
Ensure that the path to your installed jdk\bin is set to the system-environment variable 'Path' (java.exe needs to be accessible for windows' system user!)
-
Open administrative console and execute
Bouncer-<VERSION>.exe install
Bouncer-<VERSION>.exe start
to install as service and start afterwards.
For a removal of the service, execute
Bouncer-<VERSION>.exe uninstall
Configuration
Bouncer configuration
RPM and DEB
The default configuration file can be found under /opt/apiomat/bouncer/<bouncerVersion/standalone/configuration/standalone-ha.xml. Refer to Server XML Configuration for further information on the xml configuration file.Win
The default configuration file can be found under %BOUNCER_INSTALLATION_PATH%\standalone\configuration\standalone-ha.xml. Refer to Server XML Configuration for further information on the xml configuration file. Docker
Note that you can map the configuration file for Bouncer as a volume inside the container. In this case you need to enable the read-only mode by setting BOUNCER_CONFIG_RO environment variable to any non-null value. When mapping the configuration as a volume some variables will not be available anymore and you should take care of configuring the specific targeted parts as describe in Server XML Configuration.
The default configuration file for Docker can be found in the container under /opt/jboss/keycloak/standalone/configuration/standalone-ha.xml.
The Effective with RO column from the environment table indicates which variables are affected when mapping the server configuration.
Environment variables:
|
Key |
Default |
Explanation |
Effective with RO |
|
BOUNCER_CONFIG_RO |
|
Indicate to the container that the server xml configuration will be mapped as a volume. This variable enables the configuration read-only mode when its value is non-null. |
|
|
CONSUL_ENABLED |
true |
Whether the service should register to Consul. If this option is set to true, Consul must be available on CONSUL_URL. |
|
|
CONSUL_URL |
Consul URL reachable from Bouncer. |
|
|
|
CONSUL_CONNECT_TIMEOUT_MS |
10000 |
Time in ms after which a failing request to Consul will be cancelled. |
|
|
CONSUL_READ_TIMEOUT_MS |
10000 |
Time in ms after which a failing read request to Consul will be cancelled. |
|
|
CONSUL_WRITE_TIMEOUT_MS |
10000 |
Time in ms after which a failing write request to Consul will be cancelled. |
|
|
CONSUL_MAX_RETRY |
-1 |
Retry count when registering to consul has failed. Default is -1 which infinitely tries to register to consul. |
|
|
CONSUL_RETRY_DELAY_S |
30 |
Delay in seconds between consul registry retries. |
|
|
DB_VENDOR |
|
Database vendor, accepted values are either one of [postgres, mysql, mariadb, oracle, mssql]. Note that the docker image does not provide a default JDBC driver for oracle which should be volumed under opt/jboss/keycloak/modules/system/layers/base/com/oracle/jdbc/main. |
|
|
DB_ADDR |
|
Database address (e.g. localhost) |
|
|
DB_PORT |
|
Database port (e.g. 5432) |
|
|
DB_DATABASE |
|
Database name. (e..g. bouncer) |
|
|
DB_USER |
|
Database user. (e.g. bouncer) |
|
|
DB_PASSWORD |
|
Database password. |
|
|
DB_SCHEMA |
|
Database scheme (e.g. public) |
|
|
JDBC_PARAMS |
|
JDBC parameters for the database. |
|
|
JGROUPS_DISCOVERY_PROTOCOL |
PING |
Protocol to discover other instances when running in cluster mode (e.g. in kubernetes kubernetes.KUBE_PING) |
|
|
JGROUPS_TRANSPORT_STACK |
tcp |
Transport protocol when communicating between instances in cluster mode, either UDP or TCP. |
|
|
KEYCLOAK_USER |
|
Default admin user name. It must be set. |
|
|
KEYCLOAK_PASSWORD |
|
Default admin user password. It must be set. |
|
|
KEYCLOAK_USER_FILE |
|
Alternative way to provide the default admin user via a file. The configuration and secret support in Docker Swarm is a perfect match for this use case. |
|
|
KEYCLOAK_PASSWORD_FILE |
|
Alternative way to provide the default admin password via a file. The configuration and secret support in Docker Swarm is a perfect match for this use case. |
|
|
KEYCLOAK_STATISTICS |
|
Enable metrics for the datasource, undertow or jgroups subsystem. Setting the value to 'db, http,jgroups' will enable statistics for all mentioned subsystems. |
|
|
PROXY_ADDRESS_FORWARDING |
|
Configure the authentication server to read the client's IP address from X-Forwarded-For header. Should be set to true when running behind a proxy or load balancer. |
|
|
REGISTRY_SERVICE_ID |
bouncer |
Service ID used to register to Consul. |
|
|
REGISTRY_SERVICE_NAME |
bouncer |
Service name used to register to Consul. |
|
|
REGISTRY_SERVICE_HOST |
localhost |
Bouncer host used to register to Consul. |
|
|
REGISTRY_SERVICE_PORT |
8080 |
Bouncer port used to register to Consul. |
|
|
REGISTRY_HEALTHCHECK_URL |
Health URL of Bouncer reachable from Consul. |
|
|
|
REGISTRY_CHECK_INTERVAL_S |
5 |
Time interval in seconds between each health check from Consul. |
|
|
REGISTRY_DEREGISTER_S |
120 |
Time in seconds after which a failing service will automatically be deregistered from Consul. |
|
YAMBAS configuration
You need to set the following properties:
-
common.auth.servicename: Name of the service in Consul, defaults to "bouncer"
-
common.auth.url.internal: Used as fallback if Bouncer couldn't be discovered via Consul
-
common.auth.url.public: For the publicly accessible URL of Bouncer
-
common.auth.username: Username of the Bouncer admin (Or a user with the rights to create realms and change their configuration)
-
common.auth.userpass: Password of the admin (or the user)
There are also some optional properties:
-
common.auth.enabled: If set to "false" (default is true), usage of Bouncer will be disabled (e.g. no realms or users will be created). Available since ApiOmat 20.11.1 (YAMBAS 3.6.1) and 21.03.0 (YAMBAS 3.7.0).
-
common.auth.tokenRefresh.delayOnTempError: How long to wait, in seconds, before reattempting to refresh the admin/user's access token if a temporary error (e.g. server is unavailable for a few seconds) occured during the previous refresh attempt (Refreshing is done in the background, to ensure all requests to Bouncer are made with a valid token). Default value is 3. Available since ApiOmat 20.11.1 (YAMBAS 3.6.1) and 21.03.0 (YAMBAS 3.7.0).
-
common.auth.tokenRefresh.delayOnError: Similar to the above, except it is used for all other errors. Default value is 20. Available since ApiOmat 20.11.1 (YAMBAS 3.6.1) and 21.03.0 (YAMBAS 3.7.0).
Dashboard configuration
You may need to set the properties common.auth.servicename (default is "bouncer") and common.auth.url.public (for the publicly accessible URL of Bouncer)
Innkeeper configuration
You need to set the property auth.service.url
Generated services configuration
You need to set the following properties:
apiomat: service: discovery: uses: Bouncer: name: bouncer version: "[1.0,)" fallbackurl: "https://bouncer/fallback-address/auth"These properties are used for the authorization checks of the configuration endpoints of your service. You can also use them to discover the Bouncer URL to create the JWTValidator (see the usage in generated services example).
Post installation steps
After all services are set up, configured and started correctly, Yambas will already have created a Realm for "Apiomat". You should be able to see it, if you login to bouncer with the Admin credentials of Bouncer.
To be able to use the Dashboard along with Bouncer, it is necessary to "Connect" it under "Configuration" section when you're logged in with the SuperAdmin.
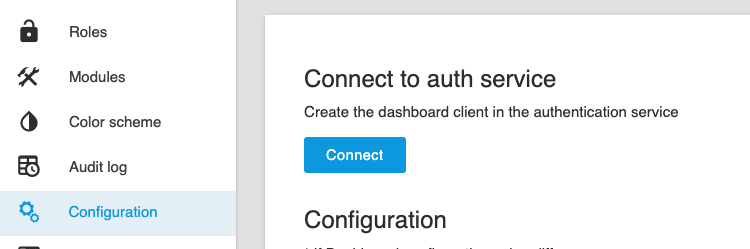
The click on the "Connect" button will internally create the ApiOmat realm within Bouncer (if it did not happen automatically during the start of Yambas) and a "Client" for the Dashboard within the Apiomat Realm.
ApiOmat will take care of creating and configuring the realm, when you create a new App-Backend. If you have an App-Backend that already existed before, you can create the realm afterwards by using the "Connect" button in the "Connect to auth service" section of the App-Backend configuration.
The ability to log in with your ApiOmat account is provided by our extension in Bouncer. The extension is contained in the ApiOmat Bouncer installation packages as well as the docker image.
The extension and it's configuration can be found in the "Apiomat" realm in Bouncer under "User federation" with the ID "yambas-user-storage". You can configure there the necessary aspects, like the MongoDB connection information or the configEncryptionKey of Yambas (which is necessary to validate the account passwords). Generally these values should already be configured correctly after the start of yambas or the click on the "Connect" button with the SuperAdmin, as mentioned above.
By default, the configuration for App-Backend Realms are left empty and therefore the configuration from the Apiomat realm gets used. However, if you want to configure it differently for one AppBackend realm you could do it, even when this is not recommended.