SMTP Module
Introduction
The SMTP module enables app developers to send emails to MTAs via the middleware. In future, it will also support messages with templates using the FreeMarker template engine.
Configuration
|
Configuration-option |
Description |
Default value |
Example |
|
SMTP Host |
Hostname of the SMTP server |
localhost |
localhost |
|
Encoding |
The encoding used to send the mails |
UTF-8 |
UTF-8 |
|
Port |
The port of the SMTP server |
25 |
25 |
|
Uses SMTP Authorization |
Indicates whether SMTP-Authorization will be used |
true |
false |
|
SMTP Username |
The username of the SMTP-account, will be ignored if authorization is set to false |
username |
|
|
SMTP Password |
The password of the SMTP-account, will be ignored if authorization is set to false |
password |
|
|
Uses StartTLS |
Indicates whether the server uses StartTLS |
true |
false |
|
Uses SSL |
Indicates whether the server uses SSL |
true |
false |
|
Uses Debug |
Indicates whether the server uses Debug |
true |
false |
Use
The SMTP module provides you the class message, a container for an email containing all data which may be included. You can also use the attachment class to attach files and images to your e-mail message. In future versions you can also use the TemplateMessage and Template-classes to comfortably create messages with a predefined text. The snippets below give you an example to handle the messages and attachments in your app.
Android
// At first configure the datastore and create or load a user:private void start( ){ //load a existing user and configure the datastore final User user = new User( ); final String userName = "john.doe@apiomat.com"; // NOTE: we use user.setUserName( userName ); user.setPassword( "123456" ); Datastore.configureWithCredentials( user ); /* save user (if it does not exist)*/ final AOMEmptyCallback saveCB = new AOMEmptyCallback( ) { @Override public void isDone( boolean wasLoadedFromStorage, ApiomatRequestException exception ) { if ( exception == null ) { loadMessages( userName ); } else { Log.e( TAG, exception.getMessage( ) ); } } }; AOMEmptyCallback loadMeCB = new AOMEmptyCallback( ) { @Override public void isDone( boolean wasLoadedFromStorage, ApiomatRequestException exception ) { if ( exception == null ) { loadMessages( userName ); } else { /* create new apiomat user*/ user.saveAsync( saveCB ); } } }; user.loadMeAsync( loadMeCB );}// Now load an existing message model:private void loadMessages( final String userName ){ final String subject = "Test subject"; AOMCallback<List<Message>> getMessagesCB = new AOMCallback<List<Message>>( ) { @Override public void isDone( List<Message> objects, boolean wasLoadedFromStorage, ApiomatRequestException exception ) { if ( exception == null ) { if ( objects.size( ) == 0 ) { /* no models found -> create a new message */ createMessage( userName, subject ); } else if ( objects.size( ) == 1 ) { /* found message --> create a new attachment */ createAttachment( objects.get( 0 ) ); } else { Log.e( TAG, "Too many messages." ); } } else { Log.e( TAG, exception.getMessage( ) ); } } }; Message.getMessagesAsync( "", getMessagesCB );}// create a new conversation model:// You can either set the HTML-text-attribute or plain-text-attribute to// create a message that contains HTML or plain-text. If you set both, the// HTML-text will be set as last part of the email and plain-text as alternative part// (according to RFC1341 clients should display the last part if they are capable to display// this mime-type, otherwise they should fall back to alternatives like plain-text). private void createMessage( final String userName, final String subject ){ final Message message = new Message( ); message.setSubject( subject ); message.setFrm( "testsender@apiomat.com" ); message.setHtmlText( "<!DOCTYPE html><html><body>Testmessage</body></html>" ); message.setPlainText( "Testmessage" ); List<String> recipients = new ArrayList<String>( ); recipients.add( userName );//NOTE: at this point, the username should be a valid email, you have to check this by yourself message.setTo( recipients ); AOMEmptyCallback saveCB = new AOMEmptyCallback( ) { @Override public void isDone( boolean wasLoadedFromStorage, ApiomatRequestException exception ) { if ( exception == null ) { createAttachment( message ); } else { Log.e( TAG, exception.getMessage( ) ); } } }; message.saveAsync( saveCB );}// After a message exists, an attachment can be attached to the message// (but you can also leave this out) and the message can be sent afterwards// by setting the attribute "sendMessage" to the long value of 1.private void createAttachment( final Message message ){ final Attachment attachment = new Attachment(); attachment.setFileName( "myFileName.jpg" ); attachment.setMimeType( "image/jpg" ); AOMEmptyCallback saveCB = new AOMEmptyCallback( ) { @Override public void isDone( boolean wasLoadedFromStorage, ApiomatRequestException exception ) { if ( exception == null ) { postAttachmentData( message, attachment ); } else { Log.e( TAG, exception.getMessage( ) ); } } }; attachment.saveAsync( saveCB );} // add the attachment data to the attachment-modelprivate void postAttachmentData(final Message message, final Attachment attachment){ byte[] data = new byte[100];//NOTE: at this point, you should load your data from elsewhere final AOMCallback<String> postAttachmentCB = new AOMCallback<String>( ) { @Override public void isDone( String resultObject, boolean wasLoadedFromStorage, ApiomatRequestException exception ) { sendMessage( message ); } }; final AOMEmptyCallback postDataCB = new AOMEmptyCallback( ) { @Override public void isDone( boolean wasLoadedFromStorage, ApiomatRequestException exception ) { if ( exception == null ) { message.postAttachmentAsync( attachment, postAttachmentCB ); } else { Log.e( TAG, exception.getMessage( ) ); } } }; attachment.postFileAsync( data, postDataCB );}private void sendMessage(final Message message){ final AOMEmptyCallback messageSendCB = new AOMEmptyCallback( ) { @Override public void isDone( boolean wasLoadedFromStorage, ApiomatRequestException exception ) { if ( exception == null ) { Log.i(TAG, "successfully saved and sent the message"); } else { Log.e( TAG, exception.getMessage( ) ); } } }; message.setSendMessage( 1L ); message.saveAsync( messageSendCB );}Objective-C
// At first configure the datastore and create or load a user:- (void) start { NSString *userName = @"john.doe@apiomat.com"; AOMUser *user = [[AOMUser alloc] initWithUserName:userName password:@"123456"]; [DataStore configureWithCredentialsWithUser:user configuration: nil]; /* Login user */ [user loadMe:^(NSError * error) { if(error == false) { [self loadMessages:userName]; } else { /* Try to create new user */ [user saveObjCWithLoadAfterwards:true completion:^(NSError * error) { [self loadMessages:userName]; }]; } }];}// Now load an existing message model:- (void) loadMessages:(NSString*) userName { NSString *subject = @"Test subject"; NSString *query = [NSString stringWithFormat:@"subject==\"%@\"", subject ]; CompletionHandlerWithResults getMessagesCB = ^(NSArray<AbstractClientDataModel *> * models, NSError * error) { if(error == FALSE) { if([models count] == 0) { [self createMessage:userName withSubject:subject ]; } else if ([models count] == 1) { [self createAttachment:[models objectAtIndex:0]]; } else { NSLog(@"Too many messages."); } } }; [Message loadListObjCWithQuery:query completion:getMessagesCB];}// create a new conversation model:// You can either set the HTML-text-attribute or plain-text-attribute to // create a message that contains HTML or plain-text. If you set both, the // HTML-text will be set as last part of the email and plain-text as alternative part // (according to RFC1341 clients should display the last part if they are capable to display // this mime-type, otherwise they should fall back to alternatives like plain-text).- (void) createMessage:(NSString *)userName withSubject:(NSString *)subject{ Message *message = [Message new]; [message setSubject:subject]; [message setFrm:@"testsender@apiomat.com"]; [message setHtmlText:@"<!DOCTYPE html><html><body>Testmessage</body></html>"]; [message setPlainText:@"Testmessage"]; [message setTo:[[NSMutableArray alloc] initWithObjects:userName, nil]]; [message saveObjCWithLoadAfterwards:true completion:^(NSError * error) { if(error == FALSE) { [self createAttachment:message]; } }];}// After a message exists, an attachment can be attached to the message // (but you can also leave this out) and the message can be sent afterwards// by setting the attribute "sendMessage" to the long value of 1.- (void) createAttachment:(Message *)message { Attachment *attachment = [Attachment new]; [attachment setFileName:@"myFilename.jpg"]; [attachment setMimeType:@"image/jpg"]; CompletionHandler saveCB =^(NSError *error) { if(error == FALSE) { [self postAttachmentData:message withAttachment:attachment]; } }; [attachment saveObjCWithLoadAfterwards:true completion:saveCB];}- (void) postAttachmentData:(Message *)message withAttachment:(Attachment *)attachment{ NSData *data = [[NSData alloc] init];//NOTE: at this point, you should load your data from elsewhere CompletionHandler postAttachmentCB =^(NSError *error ) { if ( error == FALSE ) { [self sendMessage: message]; } }; CompletionHandler postDataCB =^(NSError *error ) { if ( error == FALSE ) { [message postAttachmentAsync: attachment andWithBlock:postAttachmentCB]; } }; [attachment postFileAsync:data andWithBlock:postDataCB];}- (void) sendMessage: (Message *)message { CompletionHandler messageSendCB =^(NSError *error) { if ( error == FALSE ) { NSLog(@"successfully saved and sent the message"); } }; //send the message by setting the sendMessage attribute to 1 [message setSendMessage:1]; [message saveObjCWithLoadAfterwards:true completion: messageSendCB];}
Swift
// At first configure the datastore and create or load a user:func start() { let userName = "john.doe@apiomat.com" let user = AOMUser(userName: userName, password: "123456") DataStore.configureWithCredentials(user: user) /* Login user */ user.loadMe { (error) in if error == nil { self.loadMessages(userName: userName) } else { /* Try to create new user */ user.save { (error) in self.loadMessages(userName: userName) } } }}// Now load an existing message model:func loadMessages(userName: String) { let subject = "Test subject"; let query = "subject==\(subject)" let getMessagesCB: CompletionHandlerWithResults = { (models, error) in if error == nil { if models.count == 0 { self.createMessage(userName: userName, subject:subject) } else if ([models count] == 1) { self.createAttachment(message: models[0]) } else { print("Too many messages.") } } } Message.loadList(query: query, usePersistentStorage: false, completion: getMessagesCB)}// create a new conversation model:// You can either set the HTML-text-attribute or plain-text-attribute to // create a message that contains HTML or plain-text. If you set both, the // HTML-text will be set as last part of the email and plain-text as alternative part // (according to RFC1341 clients should display the last part if they are capable to display // this mime-type, otherwise they should fall back to alternatives like plain-text).func createMessage(userName: String, subject:String) { var attachment = Attachment() attachment.fileName = "myFilename.jpg" attachment.mimeType = "image/jpg" let saveCB: CompletionHandler = { (error) in if error == nil { self.postAttachmentData(message: message, attachment: attachment) } } attachment.save(completion: saveCB)}func postAttachmentData(message: Message, attachment: Attachment) { let data = Data()//NOTE: at this point, you should load your data from elsewhere let postAttachmentCB: CompletionHandler = { (error) in if error == nil { self.sendMessage(message: message) } } let postDataCB: CompletionHandler = { (error) in if error == nil { message.postAttachment(attachment: attachment, completion: postAttachmentCB) } } attachment.postFile(data: data, completion: postDataCB)}func sendMessage(message: Message) { let messageSendCB: CompletionHandler = { (error) in if error == nil { print("successfully saved and sent the message" } } //send the message by setting the sendMessage attribute to 1 message.sendMessage = 1 message.save(completion: messageSendCB)}JavaScript
// At first configure the datastore and create or load a user:function start() { //load a existing user and configure the datastore var user=new Apiomat.User(); var userName="john.doe@apiomat.com"; user.setUserName(userName); user.setPassword("123456"); Apiomat.Datastore.configureWithCredentials(user); /* save user */ var saveCB= { onOk:function () { loadMessages(userName); }, onError:function(error) { console.log(error); } }; /* load user */ var loadMeCB={ onOk:function () { loadMessages(userName); }, onError:function (error) { if (error.statusCode==840) { /* create a new Apiomat.User */ user.save(saveCB); } console.log(error); } }; user.loadMe(loadMeCB);}// Now load an existing message model:function loadMessages(userName) { var subject="Test subject"; //first, get all messages var getMessageCB={ onOk:function (objects) { if (objects.length==0) { /* no models found -> create a new message */ createMessage(userName,subject); } else if(objects.length==1) { /* found message --> create a new attachment */ createAttachment(objects[0]); } else { console.log("Too many messages."); } }, onError:function (error) { console.log(error); } } Apiomat.Message.getMessages ("", getMessageCB);}// create a new conversation model:// You can either set the HTML-text-attribute or plain-text-attribute to// create a message that contains HTML or plain-text. If you set both, the// HTML-text will be set as last part of the email and plain-text as alternative part// (according to RFC1341 clients should display the last part if they are capable to display// this mime-type, otherwise they should fall back to alternatives like plain-text).function createMessage(userName, subject) { var message=new Apiomat.Message(); var userNames=[userName,"username1","username2"]; message.setSubject(subject); message.setFrm( "testsender@apiomat.com" ); message.setHtmlText( "<!DOCTYPE html><html><body>Testmessage</body></html>" ); message.setPlainText( "Testmessage" ); var recipients = [ userName ]; //NOTE: at this point, the username should be a valid email, you have to check this by yourself message.setTo( recipients ); var saveCB={ onOk:function () { /* create a new message */ createAttachment(message); }, onError: function (error) { console.log(error); } }; message.save(saveCB);}// After a message exists, an attachment can be attached to the message// (but you can also leave this out) and the message can be sent afterwards// by setting the attribute "sendMessage" to the long value of 1.function createAttachment(message) { var attachment=new Apiomat.Attachment(); attachment.setFileName( "myFileName.jpg" ); attachment.setMimeType( "image/jpg" ); var saveCB = { onOk:function () { /* add attachment and send */ postAttachmentData(message, attachment); }, onError:function (error) { console.log(error); } } /* save attachment */ message.save(saveCB);} function postAttachmentData( message, attachment ){ var data = [];//NOTE: at this point, you should load your data from elsewhere var postAttachmentCB = { onOk: function() { sendMessage(message); }, onError:function (error) { console.log(error); } }; var postDataCB = { onOk: function() { message.postAttachment( attachment, postAttachmentCB ); } onError:function() { console.log( error ); } }; attachment.postFile( data, postDataCB );}function sendMessage( message ){ var messageSendCB = { onOk: function(){ Log.i(TAG, "successfully saved and sent the message"); } onError: function() { Log.e( TAG, exception.getMessage( ) ); } }; //send the message by setting the sendMessage attribute to 1 message.setSendMessage( 1L ); message.saveAsync( messageSendCB );}
You can also send messages via dashboard, by creating a new Message-Object there, filling all fields and finally set the sendMessage-Attribute to "1".
How to send a message from a module
-
Create a new Application, add the SMTP-Module to this backend and fill out the config-parameters according to your SMTP-Server
-
Create a new Module, download it import it into your IDE. Set the SMTP-Module as an included Module
-
You can send an Mail using the following code:Java
Message message =newMessage();List<String> toList =newArrayList<String>();toList.add("customer@customerMail.com");message.setTo( toList );message.setFrm("apinaut@apiomat.com");message.setSubject("Subject of the Test-Mail");message.setPlainText("This is the Text inside the Mail. Greetings, Apinaut");try{MailCreationHelper.sendMessage( message,null, r );}catch( Exception e ){e.printStackTrace();}
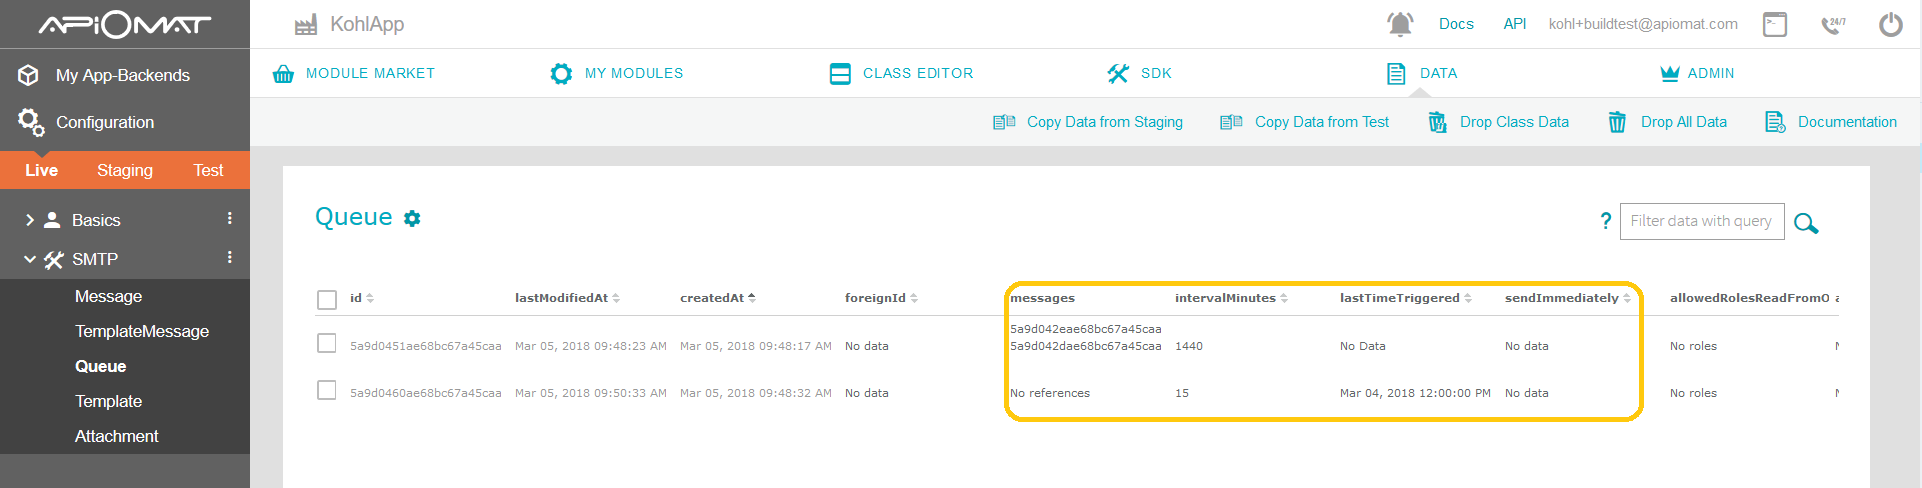
Message Queues
ApiOmat version 2.6.4 provides a new way to send messages. The idea is to bundle multiple messages in a queue to send them via batch process through one single SMTP connection. This helps to improve general performance such as network traffic optimization.
The message Queue is a new SMTP module class which references one or more Message objects. The Queue has the following attributes:
|
Attribute |
Description |
Example |
|
intervalMinutes |
This long value defines how often the queue sends messages. The minimum resolution is one minute. |
15 |
|
lastTimeTriggered |
The date value lastTimeTriggered is the base reference from which the next queue process is triggered (basically: lastTimeTriggered + intervalMinutes). Hint: You can manipulate the lastTimeTriggered value to define a specific day time for processing your Queue. |
Mar 04, 2018 12:00:00 PM |
|
sentImmediatly |
This flag triggers the queue manually. Every containing unsent Message will be sent immediatly. The sentImmediatly has to be set from 0 or empty to 1. |
1 |
|
messages |
This attributes contains a collection of referenced message objects. Queued messages will be removed automatically if they have been sent. |
<message References> |
How to create Queues (Native Module)
Java
/* create Queue */Queue queue = ( Queue ) MyModule.AOM.createObject( "applicationName", "moduleName", "modelName", request );queue.setIntervalMinutes( 15L );queue.save( );/* set messages to Queue */queue.postMessages( message );queue.postMessages( message2 );queue.postMessages( message3 );/* trigger Queue manually */queue.setSendImmediately( 1L );queue.save( );