Configuration Parameters
In the past tutorial, we used a hook-method to set a default-value for newly created objects (which in this case were groceries). This default-value was hard-coded in to the backend code. Now, suppose you want to let every customer who uses your module set this default value from the dashboard without having to download the module-code first and changing it there. That's possible by using so called Configuration Parameter.
Setting a Config Parameter
-
First, you have to set the configuration-Parameter. Inside your Project with the module-code, go to the class com.apiomat.nativemodule.[modulename].[modulename]

-
At the top of the class, there is already example on how to set a configuration-parameter (as a comment). Use this as a blueprint. All the field should be pretty self-explanatory
-
Datatype: The datatype of the config-Parameter. As we want to set a default-price, we use the Type "Number"
-
Example: An example for a value. It will be shown in an info-box provided for this config-parameter from the dashboard.
-
Title: This is the name of the parameter which will be shown in the dashboard
-
Info: An informational text that will be shown alongside the example in the info-box provided by the dashboard.
-
Default-Value: This one will be set when the module is deployed for the first time and can be changed afterwards.
-
Order: If you have more than one config-parameter, here you can set the order in which they will be shown.
-
public static String [IdentifierToCall] = "[ModuleName]_[IdentifierYouLike]". The identifier on the left part is the name by which you will call the default-value from the module-code. The right part is used by the apiomat for the internal localisation of the default-value. It is important to follow the convention that it has to start with the module-name and an underscore. the part after the underscore can be chosen as you like. The example below clarifies this expalanation.
@NativeModuleConfig(datatype = Type.NUMBER,example ="0.8",title ="Default Price",info ="This is the default price of every new grocery",defaultValue ="0.5",order =1)publicstaticString DEFAULT_PRICE ="TutorialModule_defaultPrice"; -
-
Now that you have set the Config-Parameter, upload your module-code so that your changes are synchronized.
-
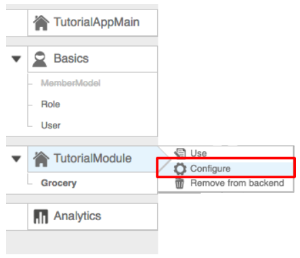
Inside the dashboard, you can now access the configuration of your module by clicking on the module-name like so:
-
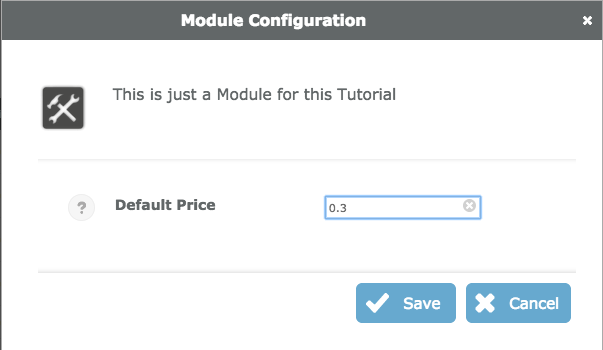
Now the Configuration-Panel opens. Set the default-price you like!
The problem: Altough you provided the option to enter a conifg parameter, you don't use the value anywhere up until this point. Next, we show you how to do that.
Call a Config Parameter
-
In this example, we set a default value for every new grocery that is created inside the GroceryHooksNonTransient-Class. We will change the code inside the beforePost-Hook like so:
-
The value of a config-parameter is called by means of the static method [ModuleName].APP_CONFIG_PROXY.getConfigValue([ModuleName].[identifierToCall], [applicationName], [usedSystem]). The [applicationName] and the [usedSystem] are provided by the incoming request, and the identifier is the one you set earlier yourself.
-
The returned value is a object, which has to be type-cast to the acutal datatype you intented to use.
@OverridepublicvoidbeforePost( Grocery obj, Request r ){Object defaultPrice = TutorialModule.APP_CONFIG_PROXY.getConfigValue( TutorialModule.DEFAULT_PRICE,r.getApplicationName( ), r.getSystem( ) );Double castedPrice = Double.valueOf( String.valueOf( defaultPrice ) );obj.setPrice( castedPrice );}
-
-
As always, upload your module-code for the changes to take place
-
Return to the dashboard and go to the data-tab. Now, every time you create a new grocery, it should automatically have the price that has been set in the configuration-dialog!

Congratulations! Now that you know how to set configuration parameters, you are well on the way of mastering the apiomat. In the next tutorial, we will show you how to build rest-endpoints.