Data access security
Limiting access to data is one of the most crucial points at developing an app. With ApiOmat, you can define various levels of access to either classes and/or objects to make your application as secure as you want.
Basic access rules
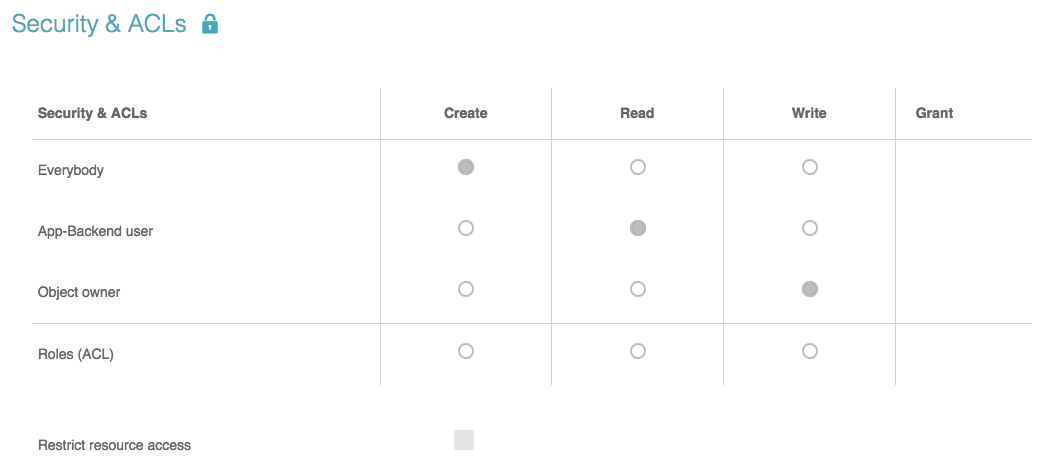
With every app you create, you can define roles needed to interact with your data. This is done in the class editor using the security panel.
Predefined roles are:
-
Everybody – Everybody having your API-Key (can be found at the App-Setup page in dashboard); username/password credentials are not needed.
-
App user – The users of your app; all instances of the class User or derived classes having a username and a password.
-
Object owner – The user who created the specific object.
Roles have a hierarchical behaviour; if a guest is able to write an object of the class, a user or the owner may do also.
You can also define a role for each type of interaction with objects:
-
Create – Object is initially created (POST)
-
Read – Object is read (GET)
-
Write – Object gets updated or deleted (PUT/DELETE)
Using the radio buttons in the security panel, you can set separate roles for each method. Since the combination of owner and create does not make sense, the radio button is missing there.
All these settings are on a class level basis, meaning that all objects of the selected class follow the settings you did for that class.
While these possibilities may suffice for most use cases, ApiOmat allows you to configure access in a much more detailed way: using ACLs.
Note regarding the default User class
The default access rules of the basics.User class allow all users to read the data of other users. You can either create a subclass and modify the access rules, or change the configuration of the module "Basics" accordingly (see Basic Module).
Access Control Lists (ACL)
ALCs enables you to do two major things:
-
define your own roles and
-
using these roles to set permissions on class and object levels
With ACLs, you can set grant rights in addition to create/read/write. The grant right is needed to modify the ACLs for an object. With no grant roles defined, only the owner of an object has the right to modify ACLs for an object. If grant roles are specified, even the owner needs to be in that role. Grant is also hierarchical, meaning that users with grant right can also write or read.
Resources
If you do not want your resources (files or images) to be accessed by guests, you can check the “Restrict resource access” box in the security panel. Each resource you attach to an object after setting this option will get the read permission of the object automatically (the permission that's defined in the class of the object as well as the object-specific permission). If your class is readable by role “myRole”, the resources attached to objects of that class are as well.
Please pay attention that this setting applies only to new resources, not to those added before the setting.
Please also note that resources by itself are not directly attached to an object, but instead "live by themselves". The above mentioned assignment of permissions happens as soon as the resource URL gets assigned to a resource attribute of an object. In the dashboard and SDK this appears as one step, but actually the steps are:
-
Upload the resource and get its location URL
-
Write this resource's URL into the object that you want the resource to be attached to.
When you attach one resource URL to several objects, the permissions of the last object that gets updated with the resource URL get assigned to the resource.
Roles
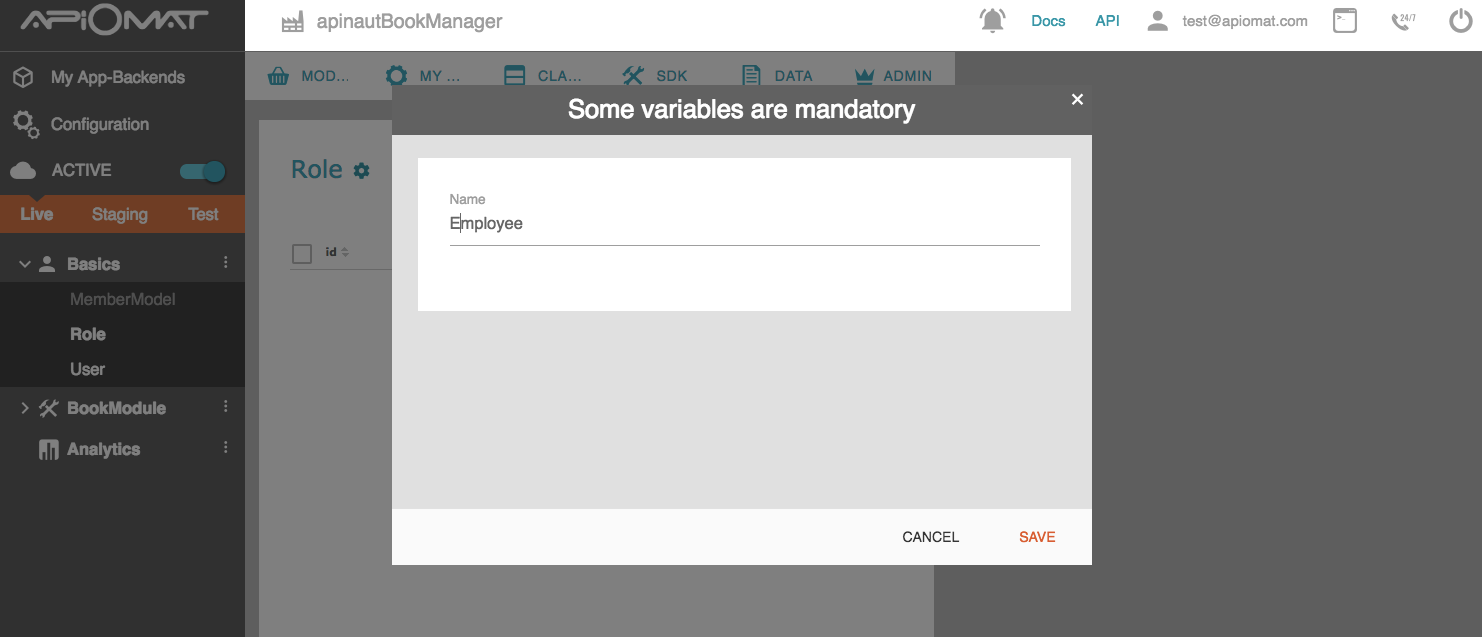
In addition to the three roles Everybody, User, and Owner, you can create your own roles in data editor or via SDK's and use the role names in the security settings. Creating a role in the data editor is very easy:
-
switch to data editor
-
select the Role class in Basics module on the left menu
-
hit the plus icon on the upper right to create a new role
-
define a name for the role in the popup
-
add user names of the users who have this role in the members attribute
Back in the class editor, you can select the Roles (ACL) radio button for the method you want to allow for your group (read/write/grant). Select the Roles name next to the radio button. You can add even more roles, each on a new line. Hit deploy and you are done.
One thing to remember:Using ACLs forbids access to the class or object to all users who are NOT members of the role. This includes owners of an object!
Object level permissions
Now that you have your own roles, you can do even more than just define class level permissions: You can also set role permissions on object level.
Therefore, each object has the three attributes
-
allowedRolesRead
-
allowedRolesWrite
-
allowedRolesGrant
Like in the class editor, you can add one role name per line here which is allowed to read the object, write the object or which role is allowed to change the ACLs for this object (the grant privilege). All settings from the class level are inherited; if you allow role A to write the object on class level and role B on you objects level, all users in role A and B are able to write the object. Especially, you can not remove the roles defined on class level on the object.
Of course, you can set both roles and these object-based values in your SDK with the setter methods and with server code.
New attributes since ApiOmat 2.5
As of ApiOmat version 2.5, you have the possibility to distinguish the roles from class level and object level within the returned JSON response. For now, there are additional fields named allowedRolesReadFromClass, allowedRolesWriteFromClass, allowedRolesCreateFromClass and allowedRolesGrantFromClass which include the class level settings and the fields. The object level settings are contained in the fields allowedRolesReadFromObject, allowedRolesWriteFromObject and allowedRolesGrantFromObject.
The combined values are still available in allowedRolesRead, allowedRolesWrite and allowedRolesGrant.
You can get these fields in the JSON response and also in our Dashboard, but unfortunately, these fields are currently not available in our SDKs. We're currently working on this issue to make these fields available in the SDKs.
The following small Java example (other languages are similar) will show how to create an “agent” role with two users which have access to
a secret document:
Role agents = new Role();agents.setName("agents");String[] agentNames = { "Foo", "Bar" };agents.setMembers(Arrays.asList(agentNames));agents.saveAsync(new AOMEmptyCallback() { @Override public void isDone(ApiomatRequestException exception) { if (exception != null) { // ... } }});AOMRole *agents = [[AOMRole alloc] init];[agents setName:@"agents"];NSMutableArray *agentNames = [NSMutableArray arrayWithObjects:@"Foo", @"Bar", nil];[agents setMembers:agentNames];[agents saveAsyncWithBlock:^(NSError *error) { if(error) { ... }}];var agents= new Apiomat.Role();agents.setName("agents");var agentNames=["Foo","Bar"];agents.setMemeber(agentNames);var saveCB = { onOk : function() { console.log("saved"); onError : function(error) { console.log("Some error occured: (" + error.statusCode + ")" + error.message); }};agents.save(saveCB);
Now you can create a document and allow access to it only by the users belonging to the role “agents”:
Document doc = new Document();doc.setName("Secure document! Burn after reading!");String[] docReaders ={"agents"};doc.setAllowedRolesWrite(new HashSet(Arrays.asList(docReaders)));doc.saveAsync(new AOMEmptyCallback() { @Override public void isDone(ApiomatRequestException exception) { if (exception != null) { // ... } }});Document *doc = [[Document alloc] init];[doc setName:@"Secure document! Burn after reading!"];NSMutableArray *docReaders = [NSMutableArray arrayWithObject:@"agents"];[doc setAllowedRolesWrite:docReaders];[doc saveAsyncWithBlock:^(NSError *error) { if(error) { ... }}];var doc= new Apiomat.Document();doc.setName("Secure document! Burn after reading!");var docReaders=["agents"];doc.SetAllowedRolesWrite(docReaders);var saveCB = { onOk : function() { console.log("saved"); }, onError : function(error) { console.log("Some error occured: (" + error.statusCode + ")" + error.message); }};doc.save(saveCB);