Bouncer
Introduction
With ApiOmat Bouncer, we introduce a service as an identity and access management solution. The service is based on Keycloak and helps you with the integration of third party authentication providers like LDAP, Active Directory and others.
The service provides a central point for authentication. When a user logs in with Bouncer, he obtains a JWT. A JWT is a token that is signed by Bouncer and includes information about the user. The JWT is included in every request as bearer authentication header and can be used to check the authorization within the services.
Installation
Please refer to the [Bouncer] Installation.
Usage
If you set up everything correctly, you can now use the existing accounts to obtain a JWT and request other services.
Structure of an ApiOmat JWT and special Fields
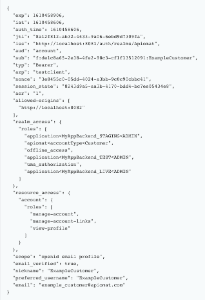
If an ApiOmat customer, organization obtained a JWT Token, the parsed token looks like this:

Example Account Token
As you can see, the issuer (the "iss" field) is the URL to Bouncer and the realm "Apiomat". Bouncer provides the "well known" OpenID endpoints under this url to be able to validate the token and to verify, that the token has been issued by this instance.
An ApiOmat customer or organization contains ApiOmat specific roles in the roles of the "realm_access" section. These roles start with the following prefixes:
-
"application" for CustomerRoles that relate to AppBackends
-
"module" for CustomerRoles that relate to Modules and Services
-
"apiomat" for overall ApiOmat-specific roles and attributes.
The prefixes are then followed by a separator "<". For applications and modules, the name of the module/service or app backend follows, along with underscore and the system. Then, another "<" separator follows and at least the CustomerRole itself is added.
The attributes starting with "apiomat" are at the moment either the "accountType", which may be "Customer", "Organization", or the "specificAccessRole" for "Supporter" accounts.
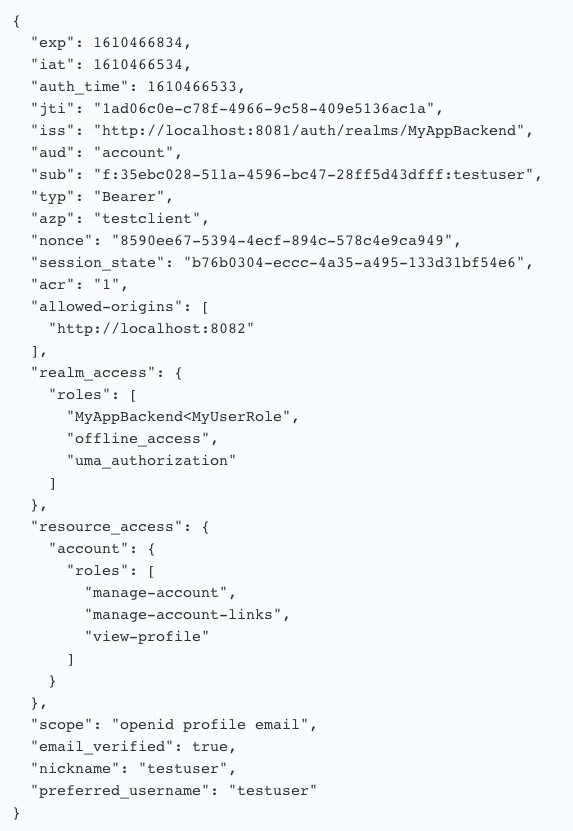
In comparison, you can see a parsed token of an app backend user:

Here, the issuer is the "MyAppBackend" realm. In this example, the App Backend has a Role "MyUserRole" where the "testuser" is a member of. This role is also contained in the roles section of the "realm_access" section of the JWT. The role is prefixed with the name of the App Backend and the separator "<".
Usage in Native Modules
You have, since ApiOmat 20.11.1 , two possibilities to get token information.
The first option is to retrieve the roles of an ApiOmat Application-Backend user over the com.apiomat.nativemodule.Request class by using the getUserRolesFromToken method. The method will either return an empty list if the user has no roles, or the parsed roles from the token. The method will return the roles after the token has been parsed. This means that the information is available in any hook after the authentication has been done. Therefore it doesn't contain any content within the auth hook. The roles that are returned by this method are the parsed roles. In the example from the above section, you'll get "MyUserRole" as element from the list. The method will always return an empty list for Customers or Organizations and for BASIC-auth requests.
The second option is to get the parsed token map over the static methods. So you would need to call the MyModuleName.AOM.getClaimsFromToken. The method getClaimsFromToken takes either the token string or the full authentication header (with the "Bearer" prefix) and returns a map with the full token information, or null if the input was invalid. You can then find the roles from the example above by getting the “realm_access” field from the map, which also returns a map with “roles” as key containing the list of roles. Please note that this will contain the full role string ("MyAppBackend<MyUserRole" in the example above), but it also contains the full token information and works for any valid JWT token in any hook where you can access the ServletRequest or the header information of the request.
Usage in Generated Services
At the moment, you'll need some manual steps to check the roles of a token. ApiOmat will support you better with these steps in a future version.
You need to add something like this in your *ServiceImpl class and then call the authorize method within the methods that you want to protect
// either use the public bouncer url here or discover the url over consul private final JWTValidator validator = new JWTValidator( "http://host.docker.internal:8081/auth" ); @Autowired private HttpServletRequest httpServletRequest; private String getAuthHeader( ) { return this.httpServletRequest.getHeader( HttpHeaders.AUTHORIZATION ); } private void authorize( final String appName ) throws MalformedClaimException, InvalidJwtException, ExecutionException { final String authHeader = getAuthHeader( ); if ( StringUtils.isNotBlank( authHeader ) ) { if ( authHeader.trim( ).toLowerCase( ).contains( "bearer " ) ) { final String token = authHeader.substring( "bearer ".length( ) ); final JwtContext ctx = this.validator.validateToken( token ); final JWTRole role = JWTRole.build( ctx.getJwtClaims( ), appName ); final List<String> userRoles = role.getUserRoles( ); // do some role checks } } }