Downloading and uploading your Service
This tutorial will guide you through the basic concepts of how to download, import and upload the code of a service. As this is just an introduction, links to more in-depth articles will be given at the appropriate places.
Download
In the previous parts of the tutorial, you created a service named TutorialService and added some classes and attributes. Now we will explain how you can download your service's source code in order to add your own logic:
-
In order to download the source code, you need to access the General settings view of the Dashboard, this can be done either by clicking on the three dots next to the service version number and selecting Use from the dropdown menu that appears, or by going to [ Components (1) > Services (2) ] in the top menu:
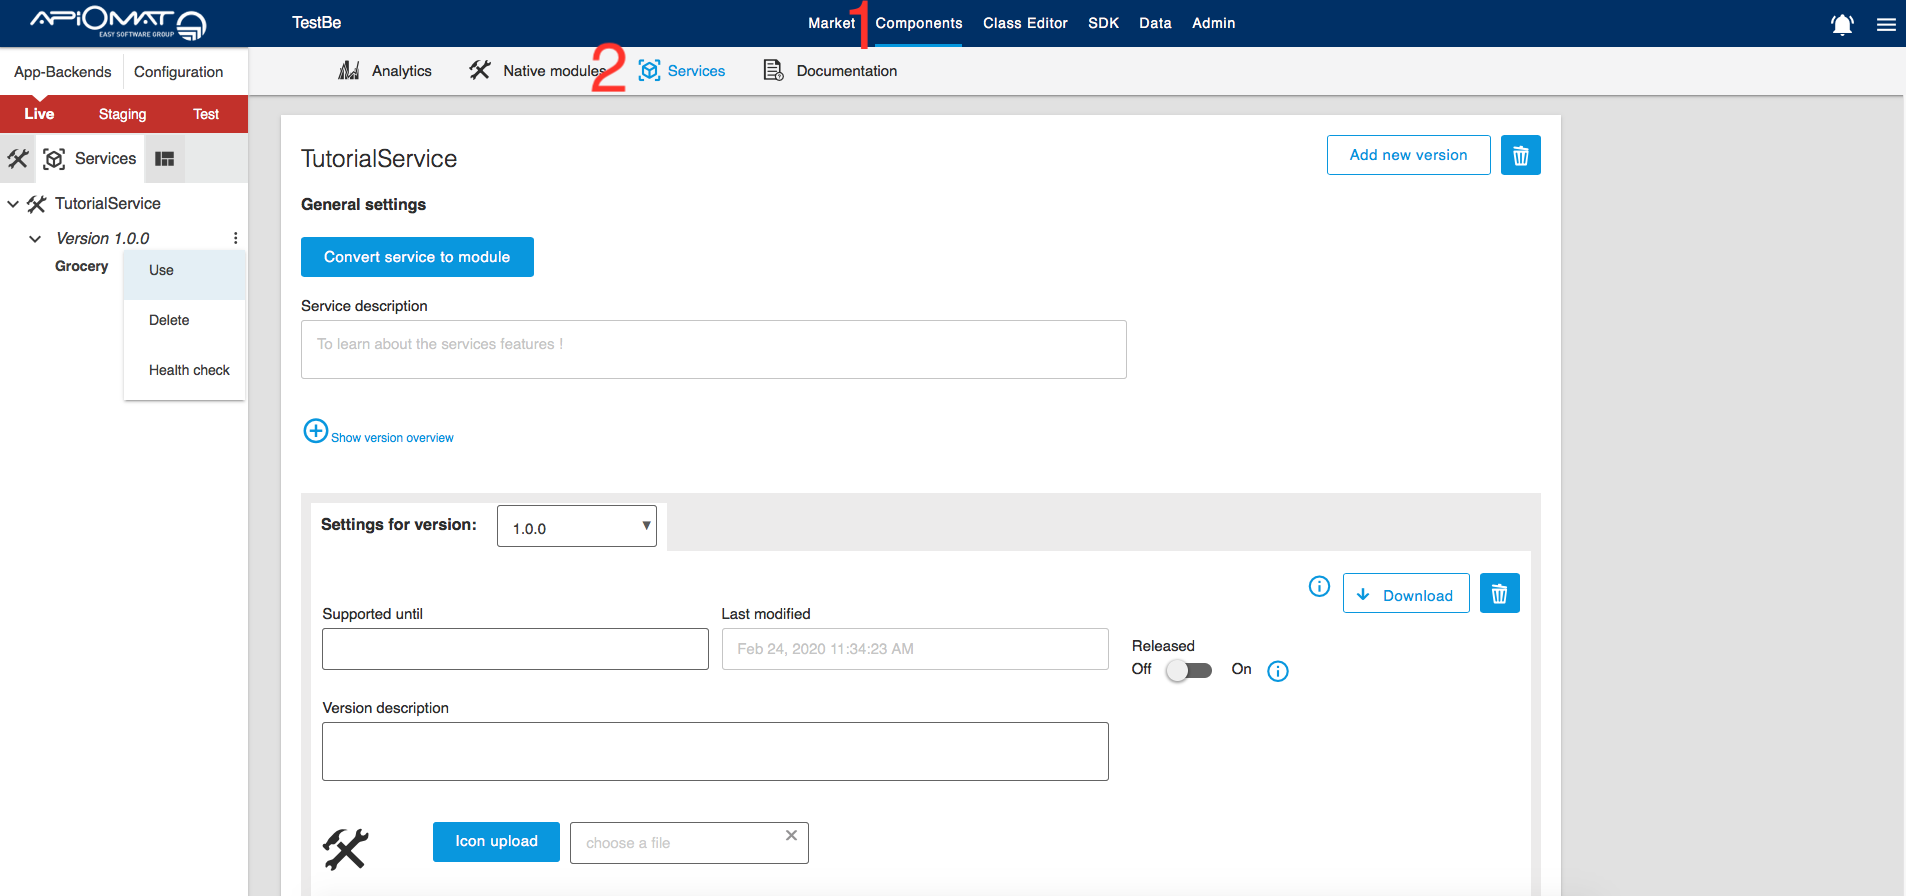
-
You can now click on the Download button to get the sources of your TutorialService version 1.0.0
-
Import the downloaded source code into your IDE as a Maven project. This tutorial uses Eclipse. Make sure that your IDE/editor uses UTF-8 character encoding to avoid problems!
-
The source code contains several generated files and classes. See Development Basics for a more detailed overview of these.
In the next tutorial we will see how you can make meaningful changes in your service logic, but first let's have a look at how you can upload any changes made to the code.
Upload
Let's say that you changed something inside the code of your service. Now you need to upload the service so you can start it and make the changes available to anyone using your application.
Until now, the editing of your service data was fully handled by YAMBAS logic, since the service was never started. In the next steps of the tutorial, we will show you how to get a started service that will provide its own meaningful logic.
Your service archive will be uploaded to a repository via the Innkeeper service.
Service uploading is done using a Maven deploy goal. As stated before, Maven needs to be installed on your local machine to work with services, and a small configuration is required to authenticate the upload request to Innkeeper:
-
In the pom.xml of your Service, note the following declaration (The URL of Innkeeper is evaluated on service generation and depends on your setup, the default value is http://localhost:2400):
pom.xml...<distributionManagement><repository><id>aomrepo</id><name>Releases</name><url>${INNKEEPER_URL}/hosting/maven2/LIVE</url></repository><snapshotRepository><id>aomrepo-snapshots</id><name>Snapshot</name><url>${INNKEEPER_URL}/hosting/maven2-snapshots/LIVE</url></snapshotRepository></distributionManagement>...This means that a deploy request on your service will be resolved using the repositories aomrepo for release versions, and aomrepo-snapshots for snapshot versions.
Note the 'LIVE' in each repository URL, this means that the service will be deployed to the LIVE repository. Innkeeper contains a repository for each ApiOmat system ('LIVE', 'STAGING' and 'TEST') but in the first version of ApiOmat service support, only the 'LIVE' system is supported. See Service Limitations for more information.
-
The first step will be to configure your maven settings.xml file, it should be located under your local ${HOME}/.m2 directory and can be created there if it does not exist yet. To add authentication configuration for aomrepo and aomrepo-snapshots, insert the following configuration (replace USERNAME and PASSWORD with your ApiOmat credentials, you can encrypt the password for additional security if necessary):
settings.xml<settings><servers><server><id>aomrepo</id><username>${USERNAME}</username><password>${PASSWORD}</password></server><server><id>aomrepo-snapshots</id><username>${USERNAME}</username><password>${PASSWORD}</password></server></servers></settings> -
Once your settings.xml file has been configured, run this Maven command from your service's root directory to deploy it:
bashmvn deploy -DcustomerName=<YOUR_CUSTOMERNAME> -DcustomerPassword=<YOUR_CUSTOMERPASSWORD> -Dhost=https://<YOUR_YAMBAS_HOST_AND_PORT>The parameters following the deploy keyword are required for the brewer-maven-plugin which runs pre-deploy logic to check if your service exists in ApiOmat, and create it if it doesn't, before doing the deployment .
It is possible to skip the brewer-maven-plugin execution by using the -DbrewerSkip parameter. You can also configure your settings.xml file with a profile that includes these parameters so you don't have to enter them every time. Please refer to the plugin documentation for further info.
Download Dashboard changes to an existing service
If you downloaded and uploaded your service like shown in the previous steps, you may want to change the model classes or create new ones over the dashboard. To get these changes, you can execute the brewer:download goal of the brewer-maven-plugin (this works similar to the nm:download goal for native modules).
mvn brewer:download -DcustomerName=<YOUR_CUSTOMERNAME> -DcustomerPassword=<YOUR_CUSTOMERPASSWORD> -Dhost=https://<YOUR_YAMBAS_HOST_AND_PORT> -DbrewerHost=https://<YOUR_BREWER_HOST_AND_PORT>
You can even define these properties within your settings.xml to be able to shorten the command (and all other goals for the brewer-maven-plugin), by just appending -P<profileName>:
<profiles> <profile> <id>YourProfileName</id> <properties> <customerName>yourCustomer</customerName> <customerPassword>yourPass</customerPassword> <host>https://YOUR_YAMBAS_HOST_AND_PORT</host> <brewerHost>https://YOUR_BREWER_HOST_AND_PORT</brewerHost> </properties> </profile> </profiles>
In this tutorial you learned about the basics of downloading and uploading services. In the next tutorial, we will see how to start and stop your service.
Next steps
-
Learn how to start your service.
-
To have a deeper overview of the service workflow, see Development Cycle.